|


Table of Contents
|
W. Into the Dark World
You knew it wouldn’t be that easy. Speaking with the king of Aliahan will trigger a booming, wrathful voice to fill his hall, revealing that the true evil is none other than Zoma, the Demon King! Obviously stressed out by the events that have unfolded, the king dismisses you. Speak with the chancellor if you’d like to save your game, and free feel to bask in the praise of the unaware townspeople.
Like any self-respecting Demon King, Zoma dwells in the Dark World, which can be found by entering the crater that we saw next to Baramos’s castle earlier. Land Ramia right in the marsh (he’s a tough bird) and enter to discover that a recent quake has widened the chasm. Hop right in!
You’ll land behind a small house near a dock. Talking to the man and the child who reside there will yield some interesting information; this is the land of Alefgard, and the castle of Tantegel can be found to the east. Hmmm! Thank them by stealing their ship and sailing for Tantegel. Once you exit the port, you’ll emerge on the world map in a small bay. Sail all of two spaces east to dock on the mainland and continue east to Tantegel. Fans of the first two games should already have a good idea of the geography we’re going to be dealing with while in Alefgard.
While the castle of Tantegel and the town of Brecconaly were two seperate entities in the first two games, they have here been fused into a single area. (Supernerds will also note that the latter has in fact been translated as “Brecconaly” instead of the previously used “Breconary” seen in the first Dragon Warrior.) Tantegel will be a nice base of operations for a while, so if you’re hard up for inventory space, the perpetual nighttime of the Dark World means you can ditch the Lamp of Darkness in the vault at Aliahan.
| Tantegel Goods & Services |
| Priest |
Yes
|
| Inn |
4
|
| Item Shop |
Medical Herb
Antidote
Fairy Water
Wing of Wyvern
Full Moon Herb
Invisibility Herb |
8
10
20
25
30
300
|
| Armory |
Wizard’s Wand
Staff of Judgment
Dragon Killer
Falcon Sword
Sacred Robe
Dragon Mail
Angel’s Robe |
1500
2700
15,000
25,000
4400
9800
3000
|
Nothing of note at the shops but for the Falcon Sword, which is really only useful for hunting Metal Babbles. Worry about picking up one or two later should you decide to grind. But head up to the second floor of the church to find Kandar! It looks like he’s finally changing his ways, and tells you a rumor that the Stone of Sunlight is hidden somewhere in Tantegel Castle.
Once you’re through gathering information from the townsfolk, head east and follow the path to the castle. One of the children on the west side will explain that Zoma has stolen the treasures of the castle and hidden them away; sure enough, the three chests in the treasury are empty. A soldier on the east side (on the other side of the barrier) explains that anyone hoping to defeat Zoma should seek out the Sword of Kings, the Armor of Radiance, and the Shield of Heroes. Sounds like our work is cut out for us.
You can walk around the castle from the east (near the cat) down to the cellar where the Stones of Sunlight were kept in the original Dragon Warrior, but no such luck this time. To find it (I guess it’s singular now?!) enter the kitchen and push against the wall at the bottom until you find a passageway. Walk up the stairs to find the stone in a chest between two flames. Our work here is done for now, but you can save your game with the king if you wish, and pick up a little more information. It seems that the village of Kol contains the Fairy Flute (just as in DW) and can be found to the east. A couple of the king’s servants even mention Ortega! Looks like he fell into the Dark World after his battle in the game’s intro.
X. The Shield of Heroes
We’ll head to Kol in due time, but right now it’s time to investigate the cave northwest of Tantegel. Fans will notice quite a bit of overlap with the original DW not just in terms of geography but also in the necessary quests to be completed. If you don’t have any herbs on you, pick up a few from Tantegel. The next cave is short, but the enemies are a bit tough and magic cannot be used. The easiest (although most expensive strategy) is to pick up four Shields of Strength from Hauksness, the next town, detailed two sections below. When used as an item during battle, the shields provide free healing that is unaffected by the cave’s magic seal. If you’re on a budget (and what adventurer isn’t?) you can just pick up one or two and pass them around between battles.
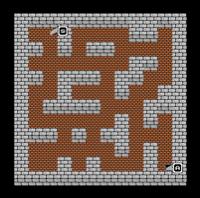
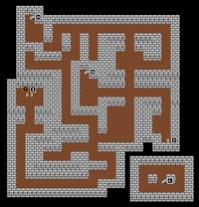
| The Cave Northwest of Tantegel |
| B1 |
 |
|
| B2 |
 |
|
| B3 |
 |
[1] 960 G
[2] 1016 G
[3] Stone of Life
[4] Shield of Heroes
|
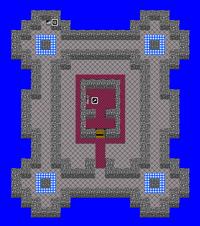
Though brief, this cave houses some nice treasure but can be a bit troublesome once you hit B2; B1 is free of random encounters. As mentioned earlier, all magic spells are sealed inside the cave. Obviously this works to your great disadvantage, but it also prevents the annoying Troll Kings from pulling off their Limbo spells, which saves you and wastes one of their two turns. Their physical strength is much more deadly, and with the handicap what it is, don’t feel cheesy for using the Parry-cancel trick here. It’s also a good idea to have your mages bust out the Staff of Thunder and Orochi Sword if you have them. Using them as items in battle will help you deal damage with the former and reduce enemy defense with the latter.
You’ll also run into Hydras and Salamanders, both of which can hose you with fiery breathe, and Archmages whose Explodet spells pose no threat in this dungeon. You might run into the occassional Winged Demon, but as their attacks are somewhat weak and their magic is useless they pose little threat. Plunder the treasure on B3 (avoiding the Mimic) and equip your Hero with the first of the three great treasures: the Shield of Heroes.
Y. The Silver Harp
While fans may be familiar with the general layout of Alefgard, the topography is quite different. For one, several key bridges are missing, and certain mountain ranges block some paths. With many more items to collect, we’ll also be dealing with a couple of nasty enemies on the world map, particularly the Boss Trolls. These guys are the same as the one you fought in Samanao, but now come in pairs. Their high HP can cause battles to drag on, making them another prime target for your Orochi Sword.
In any case, we’re now looking for a small shrine on the northwest coast (the location of Garinham in the original DW). Here you’ll find the parents of the bard Garin, who mention that their son has set out with his harp at his side. Oh really? So what’s that in the basement? Exit the house through a hidden door along the north wall to find the stairs. Pocket the harp and you’re all done here.
The harp is actually optional, a far cry from its compulsory nature in the first Dragon Warrior. When used on the world map or in a dungeon, the harp summons enemies to fight you, which can be useful for grinding on the Metal Babbles found later on. If you don’t plan to use it, chuck it in the vault, as we’re going to be collecting quite a few items soon.
Z. Hauksness
While serving only as a scorched ruin to illustrate the wrath of the Dragonlord in the first game, Hauksness is a thriving desert town in DWIII, and also our next destination. We’ll need to sail there, so heal up at Tantegel and sail west; your boat will always be docked on the coast we first arrived from after you Return to Tantegel. Follow the coastline south, sailing into the first inlet you see and docking next to the nearby bridge. Walk south, around the mountains and into the desert to find Hauksness.
| Hauksness Goods & Services |
| Priest |
No
|
| Inn |
100
|
| Item Shop |
Medical Herb
Antidote
Fairy Water
Wing of Wyvern
Full Moon Herb
Poison Moth Powder |
8
10
20
25
30
500
|
| Armory |
Zombie Slasher
Staff of Judgment
Sacred Robe
Dragon Mail
Shield of Strength
Revealing Swimsuit |
9800
2700
4400
9800
15,000
78,000
|
Definitely pick up a Shield of Strength for your Soldier to equip, and maybe another couple for your mages. They cannot equip the shield, but it provides a free Healmore spell in battle at unlimited supply! The only downside is that the shield will only heal the one who possesses it. You’ll find an item that provides unlimited free castings of the Healus spell (Healmore to all party members) in the final dungeon, so whether or not you’d like to invest in these shields is your call.
If you speak with the woman on the western outskirts of town, she’ll give us a familiar hint: the Fairy Flute is hidden four steps south of the bath in Kol. There is also a man at the armor who is looking for Oricon, and claims that there is some hidden in Hauksness! We’ll need the legendary metal to have the Sword of Kings forged in Kol, so we might as well pick it up while we’re here. Head to the southeast corner of town and enter the horse pasture. Search the center of the green area to find the Oricon. Now seems like a great time to go to Kol!
AA. Kol
A quick nautical scouting mission reveals that the Dark World does not wrap around as the surface world does, so we’ll need to take the long way around. Board your ship from Tantegel and follow the coastline west, north, and east until you spot a tower on an island. Take the next path south and dock on the land mass full of hills. Head east a bit to find the village of Kol underneath a mountain ridge.
| Kol Goods & Services |
| Priest |
No
|
| Inn |
124
|
| Item Shop |
Medical Herb
Fairy Water
Wing of Wyvern
Full Moon Herb |
8
20
25
30
|
| Armory |
Broad Sword
Sledge Hammer
Dragon Mail
Water Flying Cloth
Silver Shield
Iron Mask |
1500
6500
9800
12,500
8800
3500
|
We’re after two things here: the Fairy Flute and the Sword of Kings. The flute, as we learned from the woman in Hauksness, is buried four steps below the bath near the top of town. To get the sword, wind your way to the item shop upstairs and sell your Oricon to the shopkeeper, who just happens to be a famous blacksmith from Jipang! He’ll buy it for 22,500 gold, which will help defray the cost of the finished sword. He won’t say much after accepting it, so head back downstairs for now. Exit town and reenter. Visit the shopkeeper one more time to find him offering one new item: the Sword of Kings, for 35,000 gold! This is the sword, so equip it on your Hero as soon as possible. Your Soldier would appreciate your Hero’s hand-me-down Thunder Sword. If you have a Wizard, pick up some Water Flying Cloth at the armory for him. That’s about it! We’re finished with Kol.
Before we move on to the next town, there’s a small cave to the north of Hauksness that we can plunder a bit more easily now that your Hero is equipped to rend foes asunder. Heal up, save, and return to Hauksness. Walk north and around the mountains, east over the bridge, and north until you find a cave nestled in the mountains.
BB. The Cave North of Hauksness
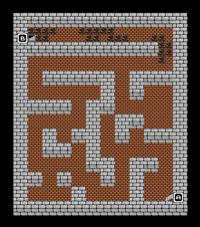
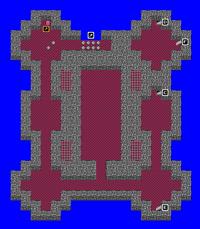
| The Cave North of Hauksness |
| B1 |
 |
[1] 1016 G
[2] Wizard’s Ring
|
| B2 |
 |
[1] Armor of Hades
[2] Invisibility Herb
|
This place is kind of a joke. Unlike the previous cave, our magic is useable, so you shouldn’t run into any healing problems. The only treasure worth getting is on the first floor, which is really what makes this one so easy. The second basement only holds a cursed suit of armor and a crappy Invisibility Herb. If it were a longer dungeon, the enemies might pose a bit of a problem. They’re mostly throwbacks to Baramos’s Castle, plus some beastly strong Darthbears (Luke, I am your bear) and King Tortragons. Just grab the gold and the ring, cast Outside, and Return to Hauksness.
CC. Cantlin
En route to the fortress city of Cantlin, we’re going to make a quick stop at a shrine to pick up the Staff of Rain, another necessary component in our master plan. From Hauksness, set out southwards, around the mountains. Head east, over the bridge, and follow the river northeast. Cross the first bridge you see, followed by a small desert and a marsh. The shrine is in the center of the marsh, and the kindly fairy inside hands over the staff. Easy!
To reach Cantlin, backtrack to the other side of the bridge and continue heading northeast, taking the next bridge next to a small marsh. Head directly south and you’ll see it surrounded by hills.
| Cantlin Goods & Services |
| Priest |
No
|
| Inn |
100
|
| Monster Arena |
Ticket |
370
|
This place is in a pretty sad state. Everyone is too terrified of the archfiend to leave their homes. As a result, the shops are all closed and there are very few people around to give us information. However, there is one useful tip to be gained here: the old man in the center of the barrier tells us how to reach Zoma’s castle. It seems we need to combine the Stones of Sunlight (check!), the Staff of Rain (check!), and the Sacred Amulet (d’oh!).
That’s really about all there is to do in Cantlin, so we might as well head for the fifth and final town of the Dark World: Rimuldar. DW fans who try to reach Rimuldar the traditional way will be prematurely blocked as the tunnel between the northern and southern continents is not yet completed. Beginning from Kol (your ship can be found docked in the west after Returning there) sail up and around the continent, eventually following the coast south. Sail inward when you see the shoals (this is the strait under which the tunnel is being dug) and dock on the southern half. Head southwest, around the mountains, until you see a town in the center of a crescent lake.
DD. Rimuldar
| Rimuldar Goods & Services |
| Priest |
Yes
|
| Inn |
80
|
| Armory |
Falcon Sword
Sword of Destruction
Cloak of Evasion
Magic Armor
Silver Shield
Iron Mask |
25,000
45,000
2900
5800
8800
3500
|
Unlike Cantlin, the townspeople of Rimuldar are very helpful. It seems that Ortega made it as far as the mouth of the river near Zoma’s castle before succumbing to the waters! On the bright side, dad left a Ring of Life with some nobody soldier near the inn, but certainly his own son has more of a right to it. Take the ring from the chest at the inn and don’t think twice about it. This handy accessory restores HP to the wearer with every step they take. Put it on your Hero for now. Could this be the very same “Fighter’s Ring” found in this same chest in the first Dragon Warrior?!
The townspeople also provide more information about Rubiss, the goddess who created Alefgard. The Sacred Amulet, which we are still looking for, is said to be proof of Rubiss’s love. Relatedly, it seems that the Armor of Radiance we also seek is kept in the tower that Rubiss was sealed in. This is the tower we saw on the island west of Kol, which we’ll contend with shortly.
One final clue can be gained from the prisoner in the jail in the southwest corner of town. Although the attending guard says that the prisoner lies, the gabby con insists that there is a secret passageway hidden behind the throne in the Archfiend’s castle.
Don’t bother with the armory, as that Sword of Destruction is cursed (what the hell, shopkeep?). Now that we have access to every major part of the Dark World, it’s time to take on the last few dungeons. When you feel that you’ve accumulated the best equipment available (mostly available for sale in Hauksness and Kol, in addition to the two legendary pieces we’ve found) return to Kol.
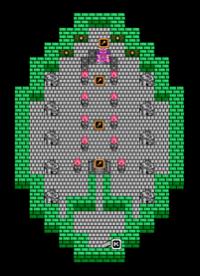
EE. The Tower of Rubiss
Head west from Kol and board your ship. Sail north to find the tower sitting perched on the island we passed earlier. The enemies inside are essentially ones you’ve already seen before, with the exception of the Leonas (which will blast you with the Snowstorm spell) and those elusive Metal Babbles! Your Pilgrim and/or Sage should have the Healus spell by now, which will come in handy after taking a frigid beating. As for the Metal Babbles, there are various ways to take them down, including Falcon Swords, the Bikill spell (both of which go great together!) and the BeDragon spell, which ignores their monstrously high 255 defense (but takes at least two turns to be useful). If you’re looking to grind, this tower is one of the best spots.
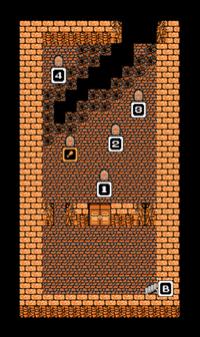
| The Tower of Rubiss |
| 1F |
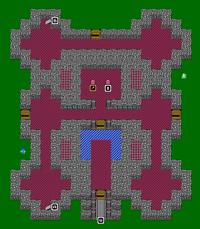 |
[1] 1016 G
|
| 2F |
 |
[1] Full Moon Herb
[2] 960 G
[3] Acorns of Life
[4] Vitality Seed
[5] Acorns of Life
[6] Acorns of Life
|
| 3F |
 |
|
| 4F |
 |
[1] Armor of Radiance
|
| 5F |
 |
|
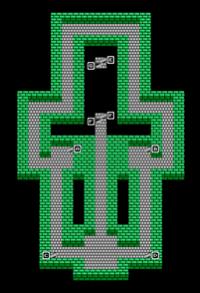
Throw on a Stepguard and head through the door into the central room, grabbing the gold from the chest on the right and avoiding the Mimic. You’ll notice two guys standing on either side of the tower, but they don’t provide any big clues. The man on the left speaks of the tower’s revolving floors, while the other guy tells you to head for the fifth floor if you have the Fairy Flute. Seeing as we do, there’s no problem. Head upstairs via [A].
2F sounds simple on paper – there are six chests to collect and only one other set of stairs – but you’ll have to contend with the aforementioned revolving floors. The way they work is simple; when standing on one of them, the orientation of your directional pad will rotate 90 degrees, depending on which of the two kinds of tiles you step on. Each diamond tile has a light half and a dark half. The dark half corresponds to your “up” direction; while standing on a tile with a dark right half, press right to walk up. It might help to rotate your controller to the left or right as you step on the appropriate tile, just to get your bearings.
Work your way carefully around the central chamber, looting the six real chests and avoiding the two Mimics. If you don’t feel like dealing with the revolving floors, the Wizard’s Stepguard spell is cheap and makes for an uncomplicated detour. Once you’re finished on 2F, head for the stairs at [C].
On 3F, head directly south and take [E] to 4F. Walk north and then left into the central path over see extending over the large pit in the center of the floor. We’ll need to deal with more revolving floor traps to get across, and there’s no way Stepguard can save our ass this time. To make it across the path, simply press up on the first three tiles, and down on the other three. Claim your Armor of Radiance from the chest and give it to the Hero! The Soldier can use the Hero’s old Swordedge Armor, but unless you’ve got another Soldier, your Armor of Terrafirma is more or less useless now. It’s always a pity when one-of-a-kind stuff becomes obsolete.
The Armor of Radiance is cool because not only does it provide extraordinary defense, it also restores HP as you walk. And because the armor and Ring of Life (which provides the same HP restoration) do not stack, you can now hand the ring over to your Soldier.
Take a leap off the edge of the floor once you’ve picked up the armor to land in the center of 3F. Head south, turning left and following the path up and around to the top. Ignore the Mimic at the corner and head for the gap in the wall. The object here is to get through the revolving floor tiles and fall down through the gap, which turns out to be deceptively easy; simply attempt to cross to the other side of the revolving tiles as if they weren’t there and you’ll end up making a beeline for the edge.
You’ll land on the north side of 1F, at a previously inaccessible side of the tower. Enter the tower through the thief’s door below and turn left, going up the stairs at [B]. Take a short walk to the right side, passing over four revolving tiles (all of which can be crossed by pressing down) and eventually taking the stairs at [D]. From here it’s a simple matter of [D] to [F], then west to [G], and you’ve made it to 5F! Enter the chamber in the center and use the Fairy Flute in front of the statue to awaken Rubiss. The grateful goddess will bestow upon the party the Sacred Amulet, which magically appears in your inventory. Cast Outside and Return to Rimuldar.
FF. The Castle of Zoma
It’s finally time to thwart the Archfiend, but wouldn’t you know it! There’s no bridge between us and his island. To remedy this, sail your ship south from Rimuldar (it’s docked on the other side of the eastern mountains when you Return there) to a small, hilly island with a single shrine on it. Enter and speak with the old man, who will combine the Stone of Sunlight with the Staff of Rain to produce the Rainbow Drop (IS ANY OF THIS FAMILIAR YET?!) granting us access to the sequestered isle.
Save your game, making sure to keep at least four open slots among your various inventories. Return to Rimuldar once again, heading northwest until you reach a dead end that just refuses to stretch across the strait. Use the drop from this point and enjoy the marshy hike to the castle of the Demon King!
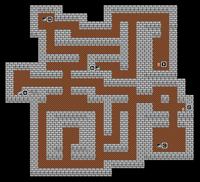
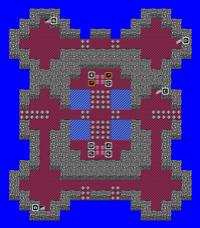
| Castle Charlock |
| B1 |
 |
|
| B2 |
 |
|
| B3 |
 |
|
| B4 |
 |
[1] Multi-Edged Sword
|
| B5 |
 |
[1] Stone of Life
[2] Leaf of World Tree
[3] Sage’s Stone
[4] Wizard’s Ring
|
| B6 |
 |
|
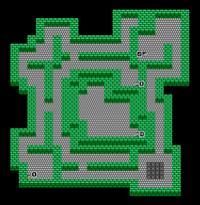
Stairs [A] through [D] can be ignored, as they only loop together on B2. If you’ve played Dragon Warrior, you know what to do! If not, recall the words of our incarcerated friend in Rimuldar: there is a hidden stairway behind the throne of the Archfiend. To reach it, head west from the entrance and work your way north, around the bend, and then south (passing by the two thief’s key doors) to reach a single door opening northward. Pass through, only to have the doorway seal itself with stone! Attempting to exit at the top of the room brings the same effect. You’ll have to fight your way out by defeating three pairs of Granite Titans, which you’ve likely fought before if you’ve ever run into a group of Goopies.
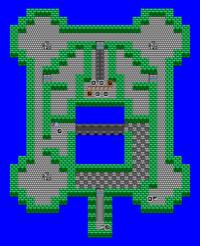
Cast StepGuard and head around the two thrones to the area at the top. Search two steps above the third golden dome from the right (as shown on the map) to find [E]. On B2, take [G] next to you to reach B3. This floor is revolving tile hell, but not so bad if you remember how to deal with them. Don’t forget! When you step on a revolving tile, your “up” is realigned with the dark half of the tile. If you don’t feel like dealing with this floor, I’ve provided a step by step path:
From [G], walk one space right and then up until you have one tile above you and one to your left. Walk left one space to stand on the tile. From here, press right, right, left, to clear this patch. Walk up three spaces to begin the next patch. Press right twice to get past it. From this spot, walk right one space to step on another revolving tile, and press left twice. Walk up two spaces to stand on the next tile, then press up, then right. Walk north two spaces and press right to pass the next tile. Almost done! Walk one space right and one space up, then press left to pass the tile. Walk two spaces north and press left again to pass the final tile. Take the stairs at [I] to reach B4.
From [I], walk west, taking southward paths at every chance. Once you hit the southern wall, head east and follow the path north to the stairs at [J]. There’s a chest on this floor containing the Multi-Edge Sword, but its curse makes it more or less worthless. The damage is nice, but it returns a quarter of it to the wielder. Now on B5, follow the path north, unlock the magic door, and continue up and around to cross a bridge and find a lone warrior battling a monster. After this scene, work your way around the floor, ignoring the first magic door you come to but entering the second one. Plunder the treasure (avoid the Mimics on either end) and then go back through the magic door and then all the way south to find [K].
Now, before we deal with Zoma, let’s take a moment to appreciate the Sage’s Stone you just picked up. This thing is ridiculous. It casts Healus for free when used as an item in battle, meaning that it should go to one of your more agile characters (probably the Pilgrim or Sage) and be used almost every round for the rest of the game. What “the rest of the game” is is really up to you, however. There are four ugly bosses waiting for you down on B6. If you want to grind, now is the best time. The Sage’s Stone makes things a whole lot easier.
GG. The Final Battles
As you descend into the darkness of B6, take a moment to heal up. To conserve MP, it’s a good idea to get into a battle with some of the less threatening goons in the castle, kill off all but the weakest, and continuously use the Sage’s Stone until everyone is ready to go.
The big man himself will greet you on B6 to kick off a four-fight boss rush, with each battle marked on the map with the red exclamation points. First up is King Hydra (100 HP regen, nothing special), followed by Baramos Bomus (half the HP of the real Baramos, twice the defense, 50 HP regen), and then Baramos Gonus (an anomalous powerhouse; his HP and strength are monstrous, but his defense is quite low, and his 50 HP regen does little). The Bikill spell will aid in speedily dropping all three of them, and your Sage’s Stone should keep everyone up and fighting. Don’t be hesitant to toss out a HealAll if need be. (Note: These three bosses will respawn if you leave the dungeon and return, regardless of whether or not you power down/reset the NES.)
Finally: The Master of Evil. The King of Demons. Zoma the Zomerian. It’s a surprisingly simple fight, mostly for the fact that he likes to throw out an icy wave every other round, causing no damage but erasing any and all buffs (Bikill, SpeedUp, Increase) on your characters. With buffs taken out of the equation, your mages can focus purely on healing while your melees bring the pain. Ah yes! Don’t forget to use that Light Orb in the first round! Doing so reduces Zoma’s stats and makes the fight much more manageable. It is possible to defeat Zoma in his original form, but he’ll be enjoying tremendous boosts to his Attack, Defense, and Agility (which actually tops out at 255, the same as metal monsters). Of course both forms employ 100 HP regen.
There’s not much more to it. This is the last hurrah, so bust out the hero’s HealUsAll if it comes down to it. Otherwise, plug away, spam Sage’s Stone, and pray for criticals. In time, Zoma will fall! And you will have saved the Dark World and ushered in an age of peace!
|

 Dragon Warrior III: A Walkthrough in Three Acts