
 |
|
|||||||||||||||||||||||||||||||||||||||||||||||||||||||||||||||||||||||||||||||||||||||||||||||||||||||||||||||||||||||||||||||||||||||||||||||||||||||||||||||||||||||||||||||||||||||||||||||||||||||||||||||||||||||||||||||||||||||||||||||||||||||||||||||||||||||||||||||||||||||||||||||||||||||||||||||||||||||||||||||||||||||||||||||||||||||||||||||||||||||||||||||||||||||||||||||||||||||||||||||||||||||||||||||||||||||||||||||||||||||||||||||||||||||||||||||||||||||||||||||||||||||||||||||||||||||||||||||||||||||||||||||||||||||||||||||||||||||||||||||||||||||||||||||||||||||||||||||||||||||||||||||||||||||||||||||||||||||||||||||||||||||||||||||||||||||||||||||||||||||||||||||||||||||||||||||||||||||||||||||||||||||||||||||||||||||||||||||||||||||||||||||||||||||||||||||||||||||||||||||||||||||||||||||||||||||||||||||||||||||||||||||||||||||||||||||||||||||||||||||||||||||||||||||||||||||||||||||||||||||||||||||||||||||||||||||||||||||||||||||||||||||||||||||||||||||||||||||||||||||
|
July 12th, 2003 | Feature | Master System
Page 4 Contents 9. Side stop: Prism 9. Side stop: PrismSince we’re in the neighborhood anyway and the Ice Dungeon is easy as pie, it can’t hurt to get a small necessity out of the way for the sake of convenience. The purpose here is to make it to the center of a small cave and slay the Titan, thus earning you a key plot item.
The Mammoths are the only things to be cautious about, as they like to appear in high numbers and can deal heavy damage. You must battle a Titan to win the Aeroprism, but you’ve likely fought them before inside Medusa’s Tower. a. Map: Ice Dungeon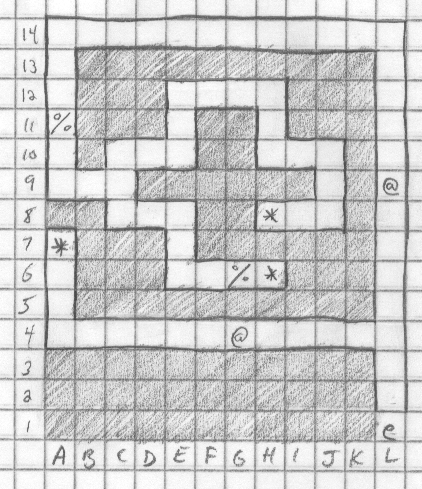 *A7 – Magic Hat 10. The Laconian ShieldHead back to town for a heal if you need it, then head for the ice cave between Guaron Morgue and the Ice Dungeon. This is Ice Cave 5, and no map is provided because it’s a one-way trip with few turns and a couple sets of stairs. It’s virtually impossible to lose your way here, so just pass on through. When you hit daylight, you’ll find yourself in a large clearing. To the north is Corona Tower (in reference to the sun, not the beer) while crossing the plain to the west brings us to what we will refer to as Ice Dungeon II. It is here the Laconian Shield lies, and here that we are headed. To avoid getting lost, simply follows the mountains below you all the way west until you hit the cave. The second Ice Dungeon is a difficult cave, not only because it houses several strong monsters, but also due in large part to its complex design. The entire thing is constructed of six floors, each with several staircases. Be sure to follow the map closely at all times to avoid getting lost and don’t be afraid to use your compass if you lose your bearings. You still might have a rough time even using the map to make a beeline for the Laconian Shield, but perservere and you will be greatly rewarded with the last bit of equipment needed for Alis, and in fact the party. a. Map: Ice Dungeon II1F 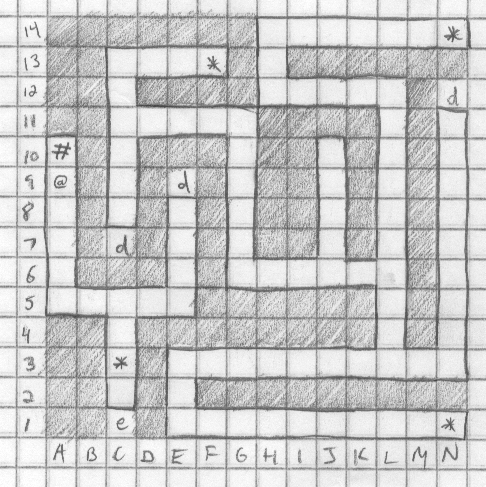 *C3 – Dezorian: “Be careful up ahead. At the break in the road, go to the left!” (FOR THE LOVE OF GOD DON’T) B1 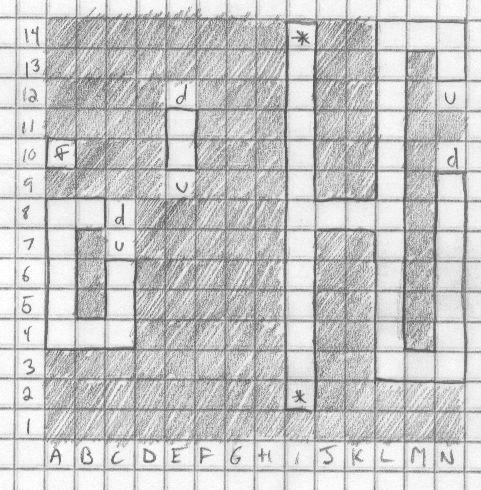 *I2 – fight w/Scorpius (no special treasure) B2 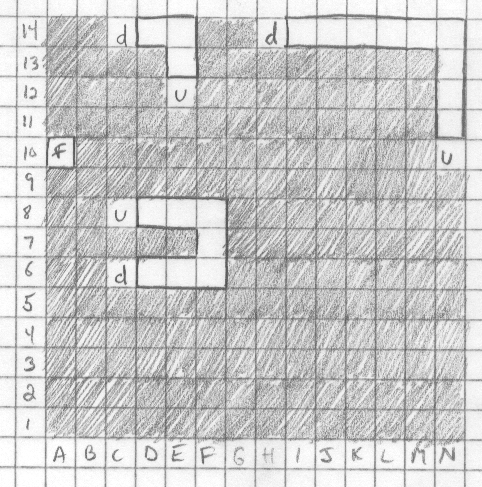 No items/events B3 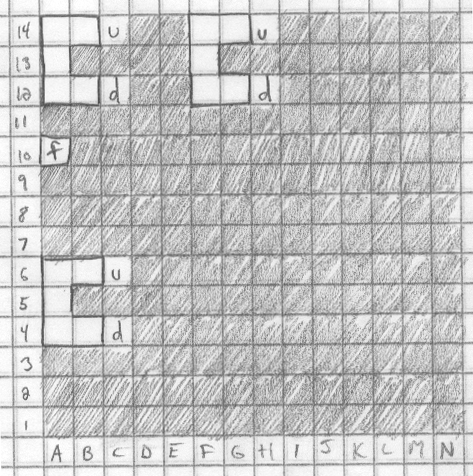 No items/events B4 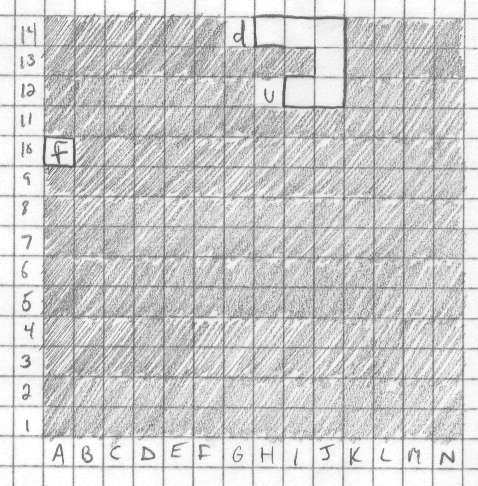 No items/events B5 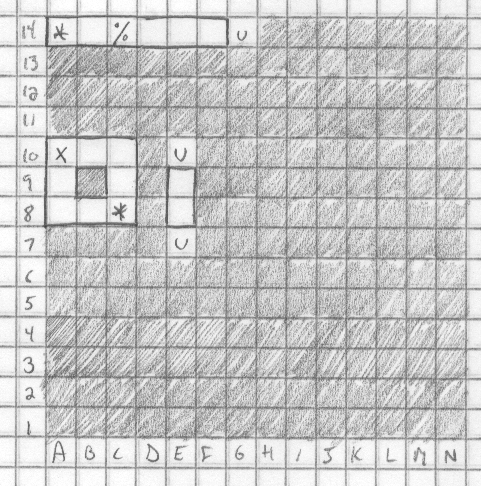 *A14 – Laconian Shield (spear trap) H. The Eclipse TorchYou’ll likely need to heal, so head back to wherever and prepare for another tower. A helpful Dezorian somewhere has hinted to us that there exists on Dezoris a ceremonial torch whose flame is like the sun. Said torch has the power to melt the ice on the Tree of Laerma and allow the party to pick a Nut of Laerma to later be used to gain access to Lassic’s Sky Castle. To set these events in motion, we need to exit Ice Cave 5 and follow the mountains north to reach Corona Tower. Make sure that you have the Amber Eye (won from the Black Dragon inside the Casba Cave on Motavia) before setting out. While there are no new enemies inside Corona Tower, the Red Dragon that you fought to win the Laconian Shield now pops up as a regular random encounter, so make sure you’ve got enough burgers or Cure spells to go around if one decides to ruin your day (as they are apt to do). 1. Map: Corona Tower1F 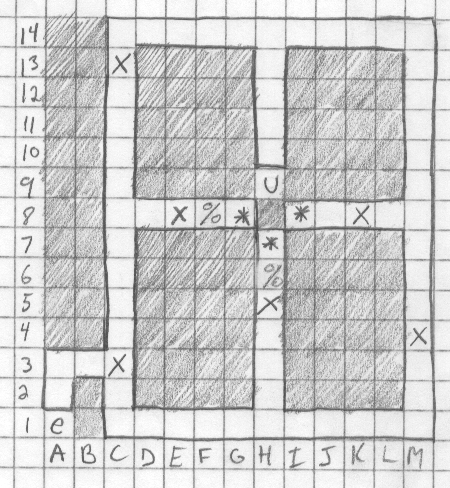 *G8 – Dezorian: “What have you come for? Do you intend some mischief?” 2F 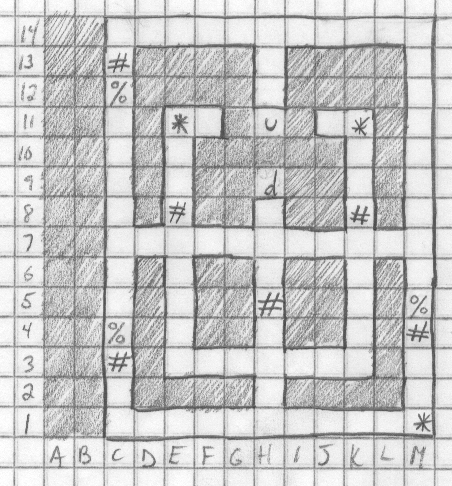 *E11 – empty (exploding trap) 3F 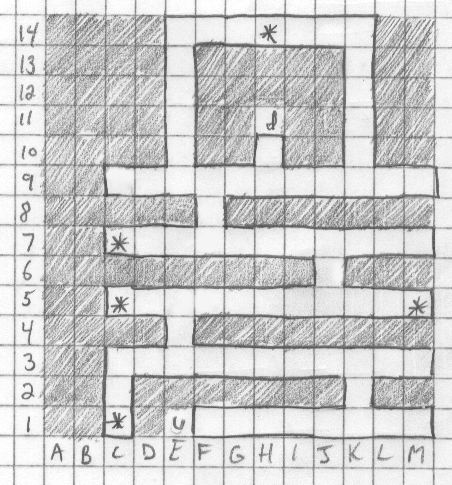 *C1 – 20 mesetas (spear trap) 4F 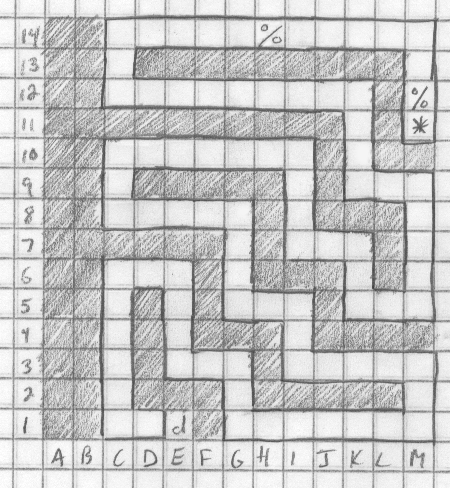 *M11 – Dezorian: “This fire was lit during the eclipse which occurs once every 100 years. If you give me a gem from a dragon, I’ll give you some of this fire. How about it?” 2. The Nut of LaermaOnce you’ve obtained the Eclipse Torch and fluted out of the tower, backtrack to the area between Ice Caves 2 and 3. Embark the Ice Digger and drive as far west as you can go, then drop south straight into the soft ice mountains until you emerge in another clearing. Stay within the path bordered by trees until you hit a lone tree in a clearing; drive over it to enter a subscreen depicting a snow-covered tree. Select the Torch from your inventory and the snow will melt, allowing you to pick a Nut of Laerma from the tree and store it in your Laconium Pot (as advised by the truth-telling citizens of Twintown). This will come in handy later. Now, it’s time to find Lassic. I. Toppling LassicLet’s do a quick recap and make sure you’re all decked out and ready to take on the evil dictator:
To reiterate a previous argument, Odin’s final weapon is a tossup between the Laconian Axe (high power some of the time) or the Laser Gun (medium power all of the time), though the gun’s accuracy makes it the clear winner for the battle with the nimble Lassic and whatever lies beyond him. Unless you’re feeling particularly lucky and ambitious, it’s probably going to take at least two trips out before you get to the top of the Tower of Baya Malay with enough spunk left to beat Lassic. Besides, there are a couple of useful treasures we’ll want to acquire by diverting from the path to the top. There are three dungeons involved in getting to Lassic; a short dungeon on the outlying perimeter, a small tunnel that reaches under the mountains, and the torturous Tower of Baya Malay. And Lassic doesn’t even live there! But we’ll burn that bridge when we come to it. Start out by exiting Suelo’s house and leaving Camineet via the east exit. Walk south and east to Scion, then north until you see a tower along a wall that stretches all along the northern segment of the peninsula. Make sure Noah’s learned the Open spell (level 17, should’ve been a while ago) and head inside. NOTE: It may be wise to never open another enemy-dropped chest from this point forward. You should probably have enough built up to afford any Burgers you may need, and the rate of booby-trapped chests is way too high. The risk is a needless one, but if you’re greedy, it’s your call. 1. Map: Perimeter DungeonThere are no enemies in this simple dungeon save for a single power-tripping Robotcop at the end. The only way to reach the other side is to answer “No” to his question and follow up by kicking his shiny metal ass all across the walls. If you say “Yes,” you’ll wind up in the “dungeon” level, where you can either hang out with the old man or find the hidden door on the side of a corridor (or simply use your trusty Flute). There’s really no point to visiting the dungeon except to say that you did, but I’ve included it here for the sake of completeness. 1F 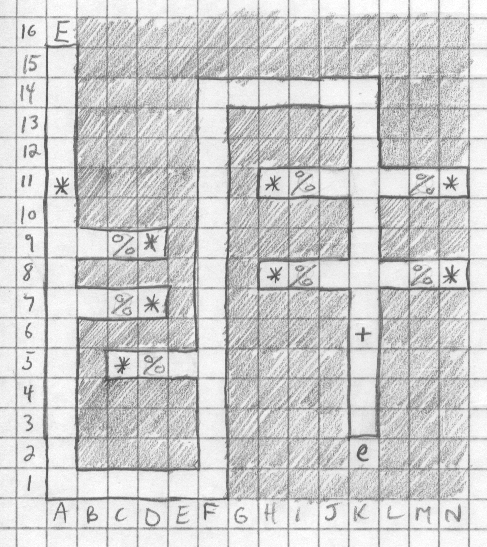 *A11 – Robotcop: “Do you have your Roadpass?” Dungeon 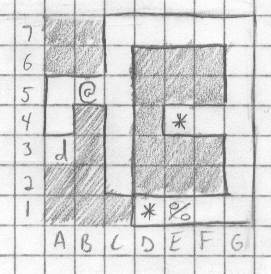 *D1 – Old man: “You have been locked up too. There is a way out, but I like it in here myself.” After exiting the Perimeter Dungeon, follow the path to the northeast and enter the cave that you see. This tunnel leads to the final tower, tucked away on a hill overlooking a nasty lava field. 2. Map: Cave to Baya MalayThis one is ridiculously short and easy, unless you run into a stray Dr. Mad. They seem to be rare, so it won’t be in issue if you make a beeline for the exit. 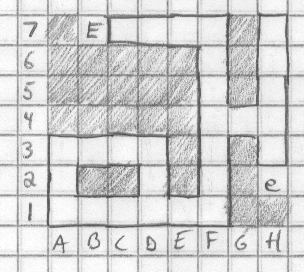 It only takes 15 steps to slog through the lava, easily fixed by a round of Heal spells or Burgers. When you’re ready, walk south towards the hill and into the Tower of Baya Malay. Watch out for Centaurs! They’re not so tough alone, but a pair of the beasts can deal some damage. The Tower of Baya Malay is easily the most difficult dungeon in the game, and for good reason; it houses two key items and is the gateway to Lassic himself. So that you don’t have to spend time navigating your way to the various treasures by yourself (I mean, you can if that’s your thing), I’ve provided some directions below for seeking out the Crystal, Miracle Key, and roof of the tower. The Miracle Key really isn’t necessary to finish the game, but it can save Noah some precious MP if you decide to go back to town even once. Just follow the maps below to the listed floors and spaces to find what you’re looking for. All possible paths of conversation from Damor the Soothsayer are listed by his coordinates on the 5F map. 3. Map: Tower of Baya MalayCrystal path: Miracle Key path: (After you’ve grabbed both of these items and gained some levels, it’s strongly recommended that you go back to town, heal, load up on Burgers at the First Food Shop, and head for the rooftop) Rooftop path: B3 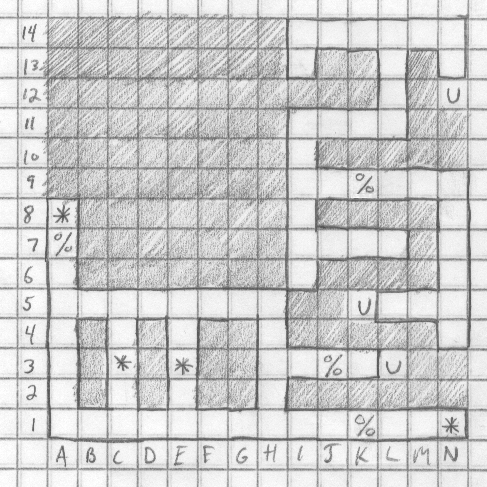 *A8 – Old man: “Do you come in full knowledge of the Tower of Baya Malay?” B2 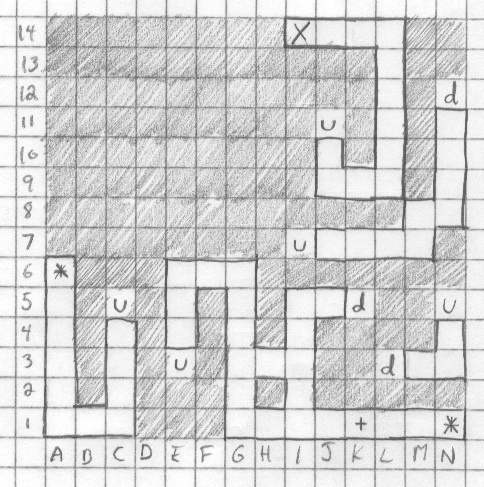 *A6 – Magic Lamp B1 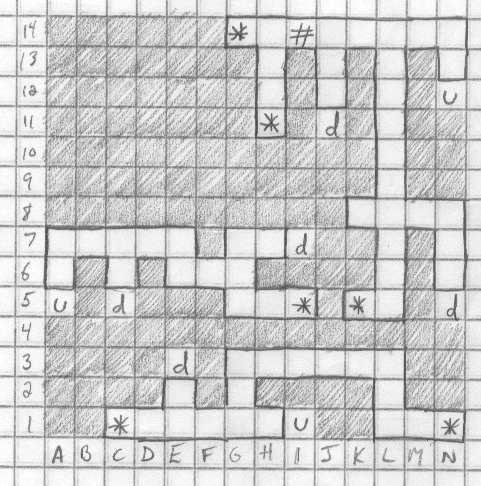 *C1 – 500 mesetas 1F 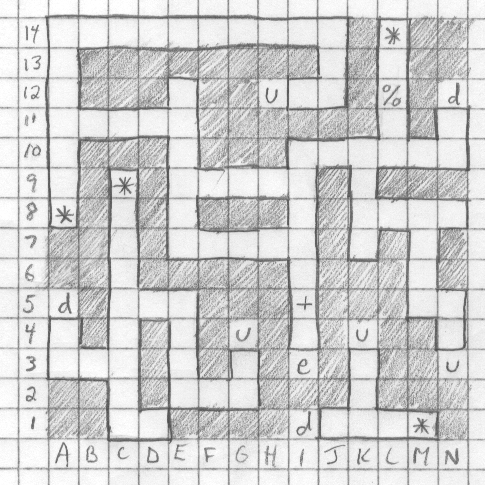 *A8 – Short Sword 2F 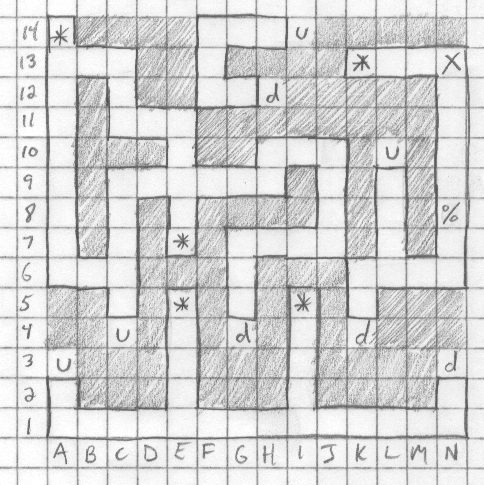 *A14 – Miracle Key (exploding trap) 3F 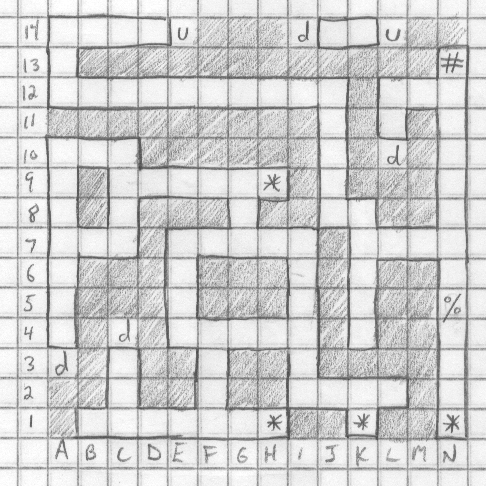 *H1 – empty (spear trap) 4F 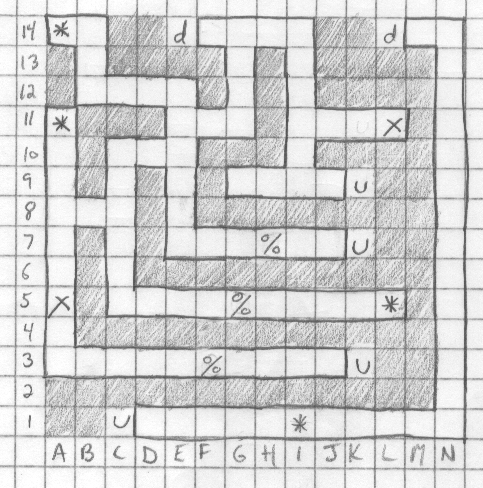 *A11 – empty (spear trap) 5F 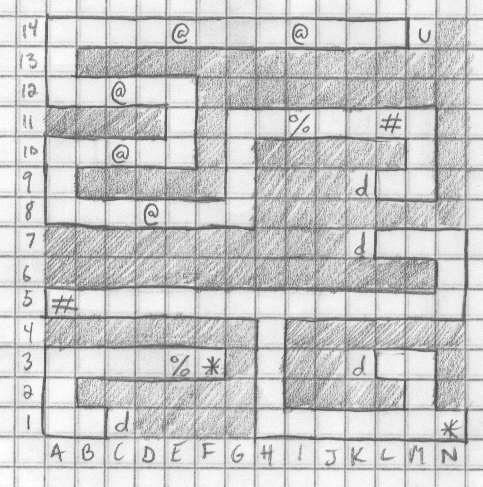 *F3 – Damor: “I’m the great Damor, soothsayer! Do you believe in my prophecies?”
Don’t waste Noah’s magic, as the dragon will fall to the party’s physical efforts. Note that since the party is riding on Myau’s back, his death during this battle will result in the deaths of the entire party as they plummet to earth. Also, if you defeat the dragon and then decide to retreat to town, he will reappear by the time you make it back up. Once the dragon is beaten, you’ll find yourself on a road in the Sky Castle. Follow the path (you can enter the houses to speak with the old men if you wish, although the last one is a Serpent) and enter the mansion at the center. This is Lassic’s mansion, and if we have our way, also his tomb. Lassic’s Mansion is populated by a mixed bag of middle- and high-end monsters. Red Dragons and Marauders may pop up often, but so can near-harmless beasts like Giants and Sphinxes. Watch out for the Marauders and Magicians in particular, as their Thunder spell can knock everyone out of the pink. Just like the Tower of Baya Malay, you must first descend before later ascending to your goal. Simply follow all the stairs down, crossover on B3, and head up the other side and right into Lassic’s chambers. You’ll encounter one “boss” on B4, Lassic’s Shadow, but he is easily taken down. 4. Map: Lassic’s Mansion1F 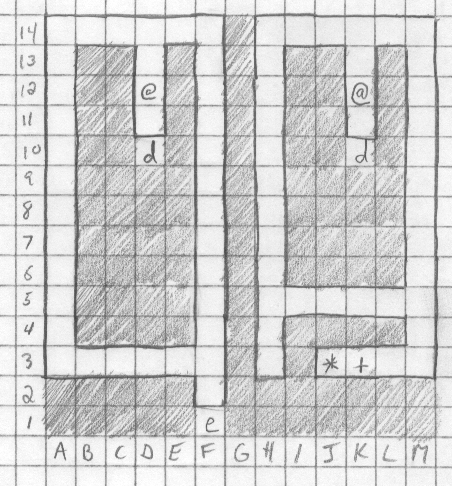 *J3 – Lassic: “Ah, my children, you have done very well to come this far. You are very lucky indeed. Do you really wish to kill an old man?” Lassic’s stats and strategy have been moved to the bottom of the map to avoid confusion. B1 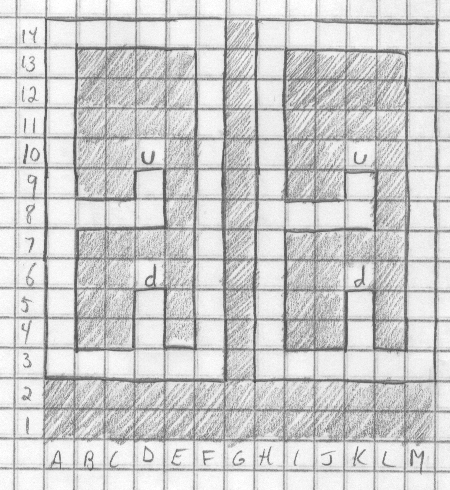 No items/events B2 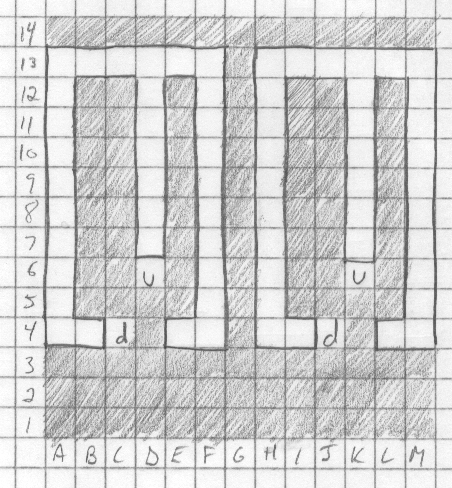 No items/events B3 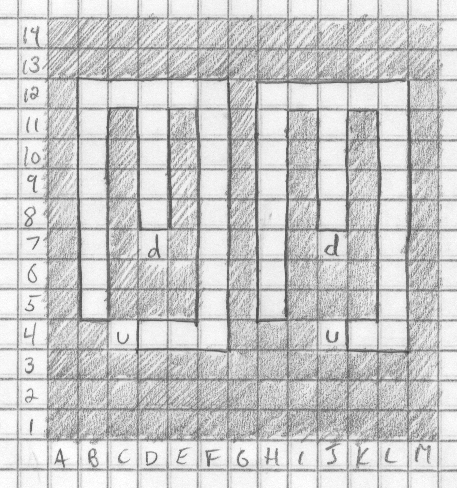 No items/events B4 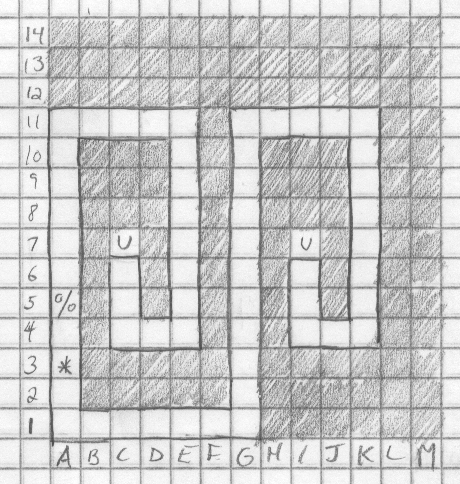 *A3 – Shadow: “I have watched all your actions. Attack me now, if you dare.” [fight w/Shadow]
The Shadow is a complete pushover. After you mow him down he’ll taunt you by “revealing” that he was only Lassic’s shadow (THE NAME SURE DIDN’T GIVE IT AWAY), though the real Lassic isn’t far off.
This is a battle where Odin absolutely needs the Laser Gun for its flawless accuracy. The battle plan should be Fight, Fight/Cure, Fight, and Wind. Why not Thunder? Well, they both do the same amount of damage to a single enemy, and Wind costs fewer MP. The fight should be a breeze if everyone is at least level 25 and you enter with max HP and enough MP for Noah to fire off a gust of Wind for 4 or 5 rounds. Don’t waste a round selecting Damor’s Crystal from your inventory; its effects are automatic and greatly reduce the damage his lightning attack inflicts on the party. Once you’ve downed the corrupt king, flute out and either cast Fly or use a Transfer to get back quickly. J. The True EnemyNow that Lassic is vanquished, we need to see the governor of Motavia as we promised. Hop in the Luveno and fly to Uzo, then exit, embark the Landrover, and head north and slightly west to reach Paseo. Enter the cave to the governor’s island (note the ominous music!) and heal at the free inn on the other side if you need it. Once you enter the governor’s mansion, the poor guy is mysteriously absent, and Alis and co. fall through a pitfall and into one last dungeon. This dungeon is a couple floors deep, but it’s all a single path up until the very bottom floor, which is the only floor I’ve provided a map for. I trust you fellow gamers are sharp enough to follow an unbranching path. When you fall through the third pitfall and find yourself before a fork, that’s when you know to look at the map. The enemies are a mishmash of those found in the Tower of Baya Malay and Lassic’s Mansion, plus some random stuff like Mammoths. This part is very tricky if you’re unsure of what to do, and the means of escape is similar to your daring escape from the Perimeter Dungeon if you chose to piss off the Robotcop. In short, there is a door located along a stretch of wall, meaning that it is impossible to see unless you turn and face the wall. This particular “hidden” door is located at D4 on the map, so once you go through make sure that everybody is healed to full strength before opening the Magic Door on the other end. If you’re not quite ready, Flute out and do whatever you have to. 1. Map: Dark Sanctum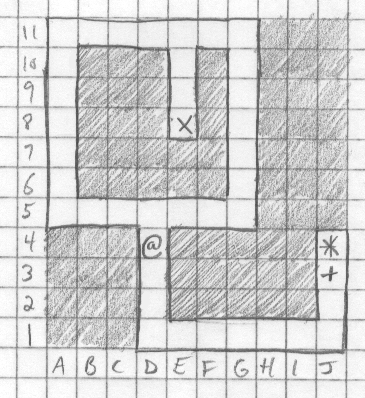 *J4 – fight w/Dark Falz
If you conquered Lassic with everyone at level 25 or higher, you needn’t spend more time bulking up. Your strategy here will be identical to the one used on Lassic, only Myau will be Curing almost every round as Dark Falz attacks with two heavy blasts each turn. His HP bar isn’t shown, but keep up the strategy of Fight, Fight/Cure, Fight, and Wind, and you should come out on top. After that, sit back and watch the ending! You’ve definitely earned it, short as it may be! At least the game has a cool staff roll sequence. For an early RPG, Phantasy Star features a surprisingly large array of arms and armor. Below is a complete list of weapons, armor, and shields, followed by their attack strength or defense, as well as an asterisk to indicate which characters can use them.
*Always does 5 damage on all enemies, 100% accuracy
Phantasy Star enables three of its four characters to use offensive and curative magic spells. As in most RPG’s, magic means the difference between life and death in Phantasy Star. Read on to learn which spells do what, how much MP they cost, when they can be learned, and who can learn them. Magic designed for use in the field or in dungeons is described below. Note that Alis’s Fly spell is rendered ineffective while inside a dungeon.
*Alis can also cast Heal in battle. The amount of support magic in this game may outnumber the amount of offensive magic, but most of the supportive spells are kind of worthless; spells like Rope and Wall wear off too quickly to be of any practical use.
Phantasy Star had a very impressive array of enemies and bosses for its time. Below are all of them, including the spoils victory over them entails. Their ability to speak (or lack thereof) is also noted, whether it be through the TALK command or a communicative spell. Note that anything that isn’t a Flash or a Cola can only be won from a boss, and only once (duh).
This FAQ was made possible by the following people (and viewers like you). – My brother Chris and father Paul, for choosing to buy Phantasy Star on a then-revolutionary Sega Master System and spark my love of games. Page Nav: « Previous ◊ | Crunk Games is a game site about nothing. Read more anyway » Feed Editorial Review Game Index Dreamcast Archives 2011 5 Random Links Howard & Nester |
||||||||||||||||||||||||||||||||||||||||||||||||||||||||||||||||||||||||||||||||||||||||||||||||||||||||||||||||||||||||||||||||||||||||||||||||||||||||||||||||||||||||||||||||||||||||||||||||||||||||||||||||||||||||||||||||||||||||||||||||||||||||||||||||||||||||||||||||||||||||||||||||||||||||||||||||||||||||||||||||||||||||||||||||||||||||||||||||||||||||||||||||||||||||||||||||||||||||||||||||||||||||||||||||||||||||||||||||||||||||||||||||||||||||||||||||||||||||||||||||||||||||||||||||||||||||||||||||||||||||||||||||||||||||||||||||||||||||||||||||||||||||||||||||||||||||||||||||||||||||||||||||||||||||||||||||||||||||||||||||||||||||||||||||||||||||||||||||||||||||||||||||||||||||||||||||||||||||||||||||||||||||||||||||||||||||||||||||||||||||||||||||||||||||||||||||||||||||||||||||||||||||||||||||||||||||||||||||||||||||||||||||||||||||||||||||||||||||||||||||||||||||||||||||||||||||||||||||||||||||||||||||||||||||||||||||||||||||||||||||||||||||||||||||||||||||||||||||||||||
| © 2003-2011 Crunk Games. All rights reserved. To Top | Home |