|
N. The Green Orb: Tedanki
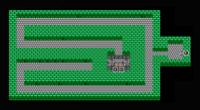
We’ll start with the easiest orb. Return to Portoga and sail south to Tedanki. It will be night when you arrive, which is exactly what we want. Open the prison door and speak with the prisoner to receive the Greeb Orb. Simple! Note that if your inventory starts getting bogged down by orbs over the course of your search, you can dump them off at the Shrine of Ramia anytime. Just stand on any of the six white spaces within the shrine and use each orb to light a fire and remove it from your inventory.
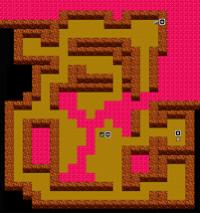
O. The Red Orb: Pirates’ Hideout
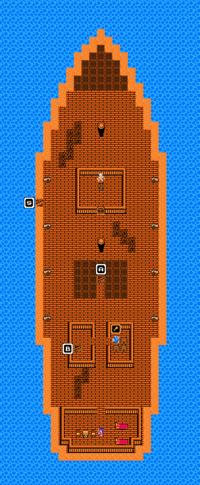
From Aliahan, sail your ship east and up the coast until you reach the middle of the island. Head east and you will soon come to another continent, with what appears to be a village. This is the Pirates’ Hideout, as the man near the entrance explains. You can complete this small quest during either day or night, but will be able to obtain some useful information from the pirates if you choose to visit at night. One of them mentions that a Sailor’s Thigh Bone can be used to locate the Phantom Ship, and that an old man in Greenlad has it.
Anyway, what we want is not in the main building. From the entrance, walk east around the building until you reach a boulder. Push it one space in any direction and examine the ground it previously occupied to find a staircase. In the basement, plunder the three chests to receive a Wing of Wyvern, a Strength Seed, and the Red Orb. The remaining four orbs are, sadly, not so easily obtained.
P. The Yellow Orb: Newtown
This one must be done in stages and will take a while. To get it started, Return to Aliahan and create a Merchant character at Luisa’s if you haven’t already. Take someone out of your party and put the Merchant in. Return to Portoga and sail west until you hit some mountains. Follow the coast north until you spot a green clearing amid the forest. Enter to find an old man sitting alone in a house.
Speak with him to be given the option of leaving your merchant there to begin a new town. Do so and speak with the old man again to learn about a treasure buried near the well in a village called Soo. You can also speak with your merchant to be thanked for the many adventures that never happened. Return to Aliahan and put that fourth member back in the party.
This town will evolve over about six stages, the final one culminating in the party receiving the Yellow Orb. It’s nice to check back every so often to see how things are going, but I’ll warn you when it’s time. For now, we can take a small detour to find the village of Soo. From Newtown, follow the coast south and then west until you find an inlet. Sail up into it and take the central river. Take the next left, then north when you can. Continue winding your way north until you see Soo.
| Soo Goods & Services |
| Priest |
No
|
| Inn |
20
|
| Armory |
Cypress Stick
Club
Poison Needle
Thorn Whip
Clothes
Flashy Clothes
Fighting Suit
|
5
30
10
320
10
1300
800
|
| Item Shop |
Medical Herb
Antidote Herb
Fairy Water
Wing of Wyvern
Full Moon Herb
Poison Moth Powder
Invisibility Herb
|
8
10
20
25
30
500
300
|
As you can see, Soo is just about worthless. The shops carry nothing of interest, and all of the townspeople’s information would have been much more useful about ten levels ago. However, there is one good reason to visit Soo; remember what the old man in Newtown said after you gifted him with a Merchant? Search the space below the well to score a free Staff of Thunder. This weapon is pretty bad in the hands of a meleeing Wizard, but can be used to cast Firebane for free in battle by any character. I like to give mine to the Pilgrim to help balance out the damage, but the staff will really come in handy when it comes time to hunt for the Blue Orb.
With events set in motion for our eventual finding of the Yellow Orb, it’s time to focus on the next one.
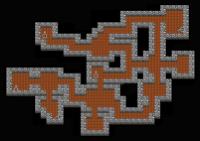
Q. The Purple Orb: Jipang
To reach Jipang, sail east a short distance from the Shrine of Dhama until you see a Japan-shaped group of islands with a town and a cave. Jipang has neither goods nor services, but the small shrine on the nearby mainland can provide a good night’s rest for 60 G.
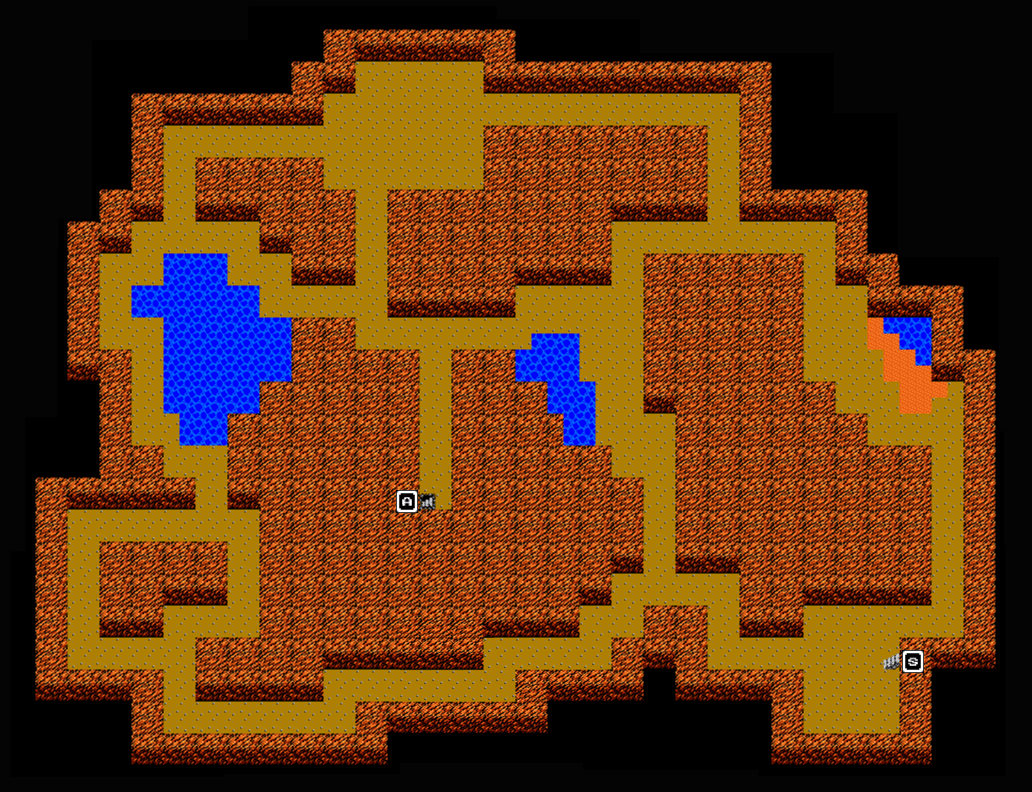
A quick chat with the villagers reveals that Jipang is plagued by a horrible beast called Orochi, which demands female sacrifices from the people of the island. Himiko, the leader of Jipang, is clearly distraight and wants nothing to do with the filthy foreigners (although interestingly enough, it seems that your name has preceded you). Shame, because Himiko holds the Purple Orb. To get on her good side, we’re going to have to slay the Orochi, a punk bitch of a hydra, which sleeps in the cave next to town.
The cave itself is pretty brief, but the enemies can be annoying as hell. Derangers love to confuse your party, King Froggores will frequently stick sleep spells, and Metal Slimes, while laden with experience points, will flee early and often. And of course there’s a five-headed dragon waiting for you at the bottom.
Now is the time to get caught up on any slacking we’ve been doing in regards to equipment. Before standing a chance at defeating Orochi, your party should be decked out in the following, some or most of which you probably already have. Note that everything can be purchased either from Tedanki or Assaram.
|
Hero |
Zombie Slasher
Magic Armor
Iron Shield
Iron Mask |
9800
5800
700
3500 |
|
Soldier |
Zombie Slasher
Magic Armor
Iron Shield
Iron Mask |
9800
5800
700
3500 |
|
Pilgrim |
Iron Spear
Sacred Robe
Bronze Shield
Iron Helmet |
750
4400
180
2000 |
|
Sage |
Zombie Slasher
Magic Armor
Bronze Shield
Iron Helmet |
9800
5800
180
2000 |
|
Total |
|
Grinding rules |
There’s even stronger stuff for sale in the remote kingdom of Samanao if you can never quite feel ready enough, but it’ll cost you. Four Silver Shields and a couple of Dragon Killers should suffice. For information on how to reach Samanao, skip ahead to the Silver Orb section.
Once you feel sufficiently equipped, enter the cave next to Jipang.
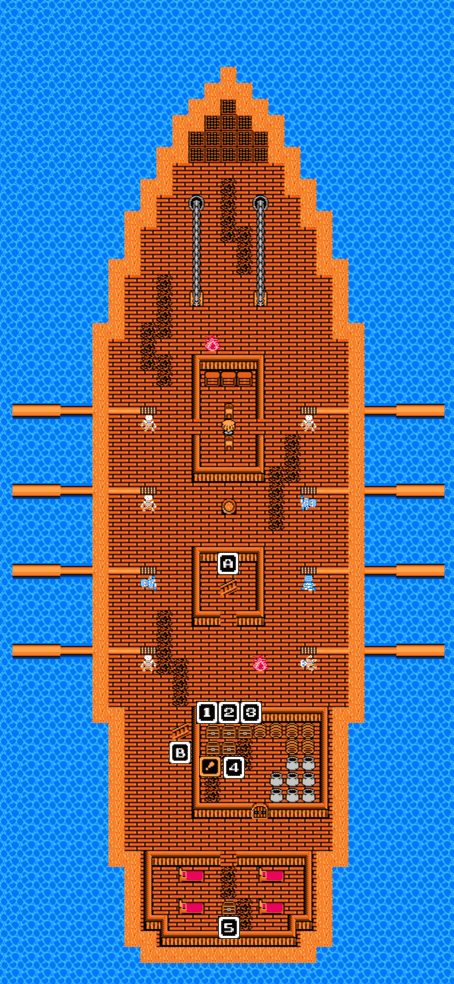
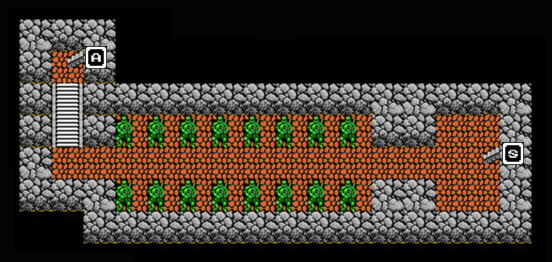
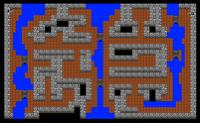
| Orochi’s Lair |
| B1 |
 |
[1] Noh Mask
|
| B2 |
 |
|
If you want to grind, this is a pretty good spot. Metal Slimes loves to show up in packs, and downing even one of them will probably result in at least one level up. Try to get your Sage up to within a few levels of the rest of the party before fighting Orochi. I managed to take her down with a level spread of 25/25/25/19, but I got pretty lucky with the attack pattern.
This cave’s single treasure, the Noh Mask on B1, is cursed and should not be equipped by anyone. It ups defense by a stern 255 points, but puts the wearer into permanent Confused status and disables the use of items (including keys) outside of battle. It’s actually somewhat useful if you’re doing a solo Hero run, but don’t bother picking it up otherwise.
Heal up before engaging Orochi on B2 (use the Hero’s MP, don’t waste your healers’) and prepare to take a beating. This is actually the first of two fights with the Orochi, but you will have a chance to heal up between them, so go all out. The Hero and Soldier should concentrate on attacking, while the Pilgrim and Sage can toss out a SpeedUp and Increase, respectively, and then focus on healing for the rest of the fight. Orochi attacks twice per turn, and seems to choose a breath attack most of the time, which hoses the party for 20-40 HP per breath. SpeedUp will help in repairing the damage at the beginning of the next turn before she spews more fire at you. The beast has an invisible HP regen of 100 HP per round.
Orochi will drop the Orochi Sword, which isn’t as good as the Zombie Slasher, but is good for free castings of the Defence spell when used as an item in battle. It’ll come in handy later, so hold on to it. Follow Orochi through the portal and you’ll come out in the palace of Jipang. Now’s your chance to heal up and save before round two, so take advantage. Speak with Himiko and answer “No” when you’re ready.
The second fight is actually a bit easier, but it’s still smart to save. Just repeat the same strategy as before and Orochi will fall in short order. Examine the chest under your fallen foe to claim the Purple Orb.
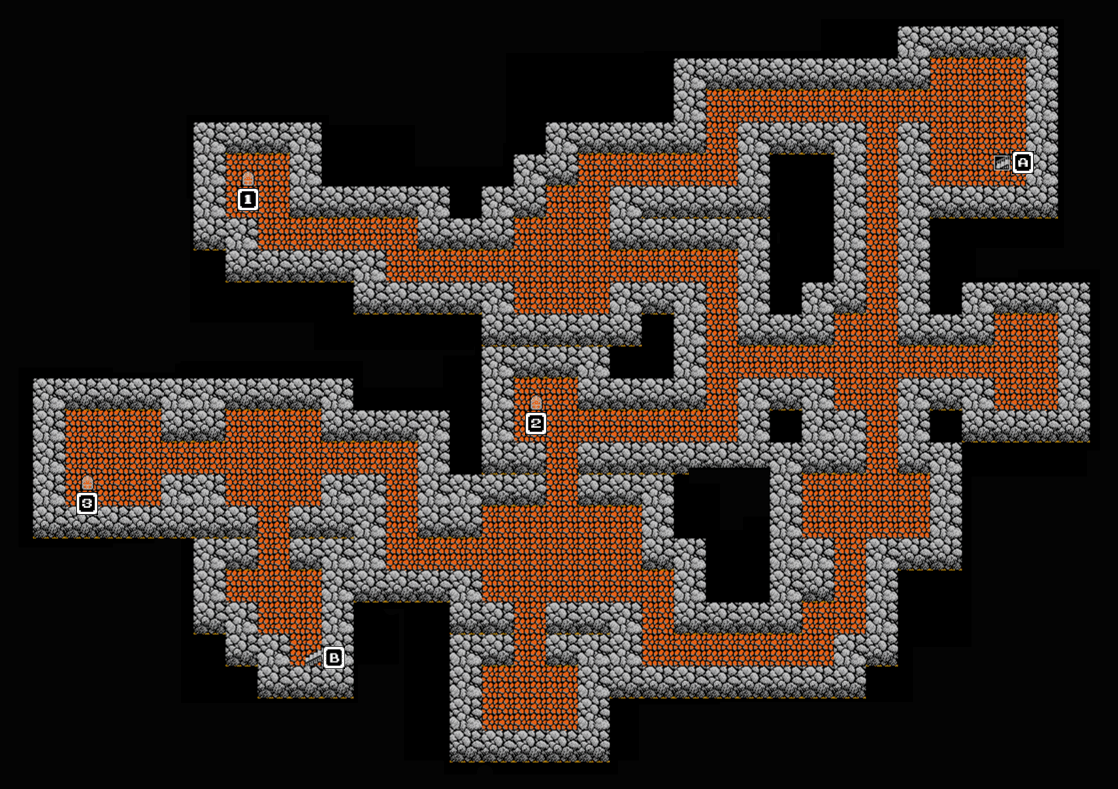
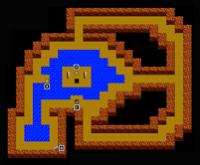
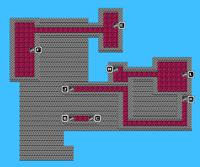
R. The Blue Orb: Lancel
Obtaining the Blue Orb involves sending one character on a lone journey through the Navel of the Earth, a cave connected to the town of Lancel. The chosen character is whoever occupies the lead position in your party, and if that isn’t your Hero, it should be. You’ll need his superior stats and spells to make quick work of this quest.
Inventory management is crucial here, so your Hero’s inventory should consist only of four pieces of equipment, the Final Key, and the Staff of Thunder. We will be using every consumable item found in the Navel of the Earth to make room for the Blue Orb and Armor of Terrafirma. Walk around the edge of Lancel and into the temple when you’re ready. Speak with the priest and answer “Yes” to enter the cave.
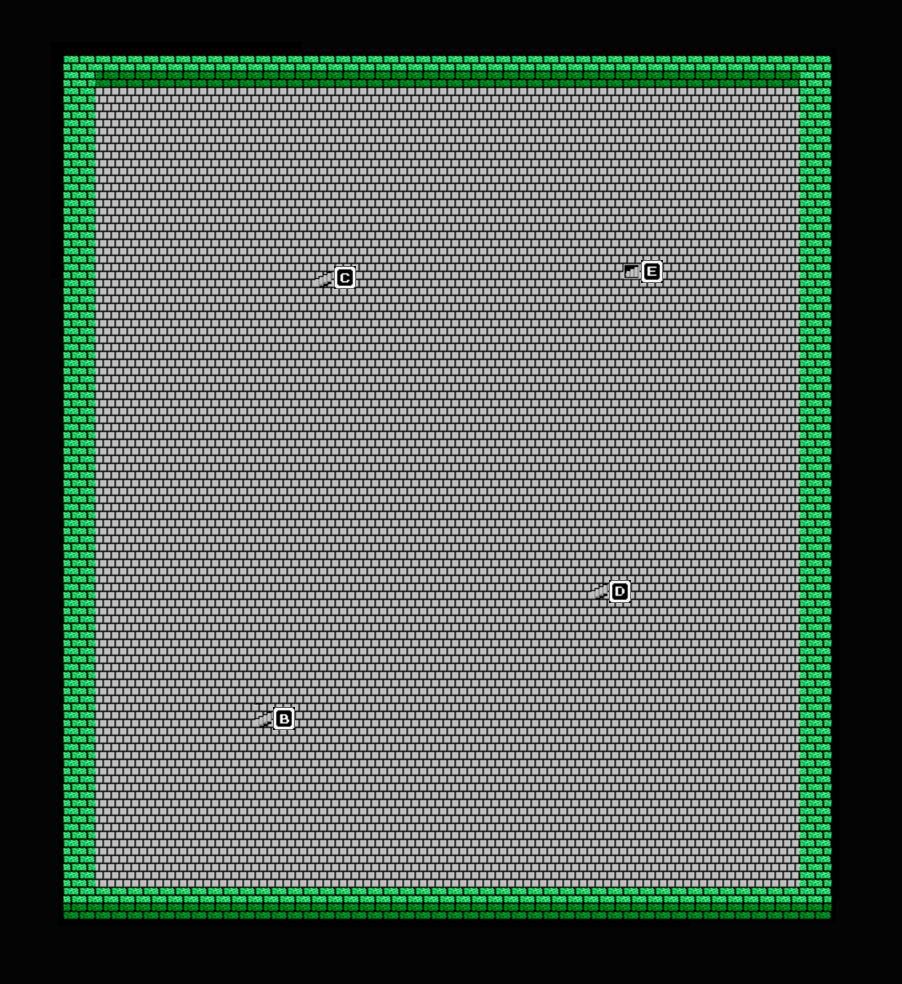
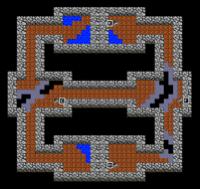
| The Navel of the Earth |
| B1 |
 |
[1] 248 G
[2] Intelligence Seed
[3] Armor of Terrafirma
|
| B2 |
 |
|
| B3 |
 |
[1] Medical Herb
[2] Blue Orb
|
The Staff of Thunder will come in handy against the Infernus Crabs, those snippy little darlings who love to pump up their defense with magic. It’s also good for big groups, but against single targets your Zombie Slasher will naturally do more damage. You shouldn’t have to heal too much, but remember to save 8 MP to cast Outside at the end.
Head south from the start, ignoring the infinite horizontal hallway. Grab chests [1] and [2], and descend via [B]. In the expansive B2, head east and up a bit to find [D] (it’s a bit hard to spot amid the floor tiles), which leads to the Armor of Terrafirma on B1. Return to B2 and walk straight north to find [E]. On B3, head north at the fork and follow the path. Disembodied voices will attempt to weaken your resolve, but can easily be ignored if you believe in yourself. Grab the Blue Orb and cast Outside to return to your comrades.
S. The Silver Orb
The last orb is a pain and a half, as you must complete three separate quests in order to obtain it. The orb lies on the other side of the Cave of Necrogond, which is itself inaccessible until the Sword of Gaia is hurled into the volcano. The Sword of Gaia lies in a shrine that cannot be reached until we plunder the treasure of the Phantom Ship, and that cannot be located without the Sailor’s Thigh Bone; the old man in Greenlad has it, remember? And he desperately wants the Staff of Change, which is owned by the king of…
1. Samanao
The first leg of the trip takes us to the kingdom of Samanao, the castle surrounded on all sides by mountains and shoals in the southeast quadrant of the world map. To get there, we’ll need to make use of the travel doors. Start from Romaly and walk as if to Portoga, following the coast to the small shrine. Enter the Magic Key door and go downstairs, then enter the Final Key door on the south wall to find a travel door.
You’ll come out in a shrine containing a total of three travel doors. Take the northern one, and when you come out the other side, the one immediately above you. You’ll end up in a shrine with a priest. Step outside to find yourself inside the enclosed southeastern continent. Head north, cross a bridge, and work your way southwest to the kingdom of Samanao. A path in the trees leads the way. Mind the enemies; it’s a pretty short walk, but the Kongs and Grizzlies can rip you apart.
| Samanao Goods & Services |
| Priest |
Yes
|
| Inn |
80
|
| Armory |
Iron Claw
Staff of Judgment
Zombie Slasher
Dragon Killer
Magic Armor
Silver Shield
Wizard’s Wand
|
770
2700
9800
15000
5800
8800
1500
|
| Item Shop |
Medical Herb
Antidote Herb
Fairy Water
Wing of Wyvern
Full Moon Herb
Poison Moth Powder
|
8
10
20
25
30
500
|
| Monster Arena |
Ticket
|
260
|
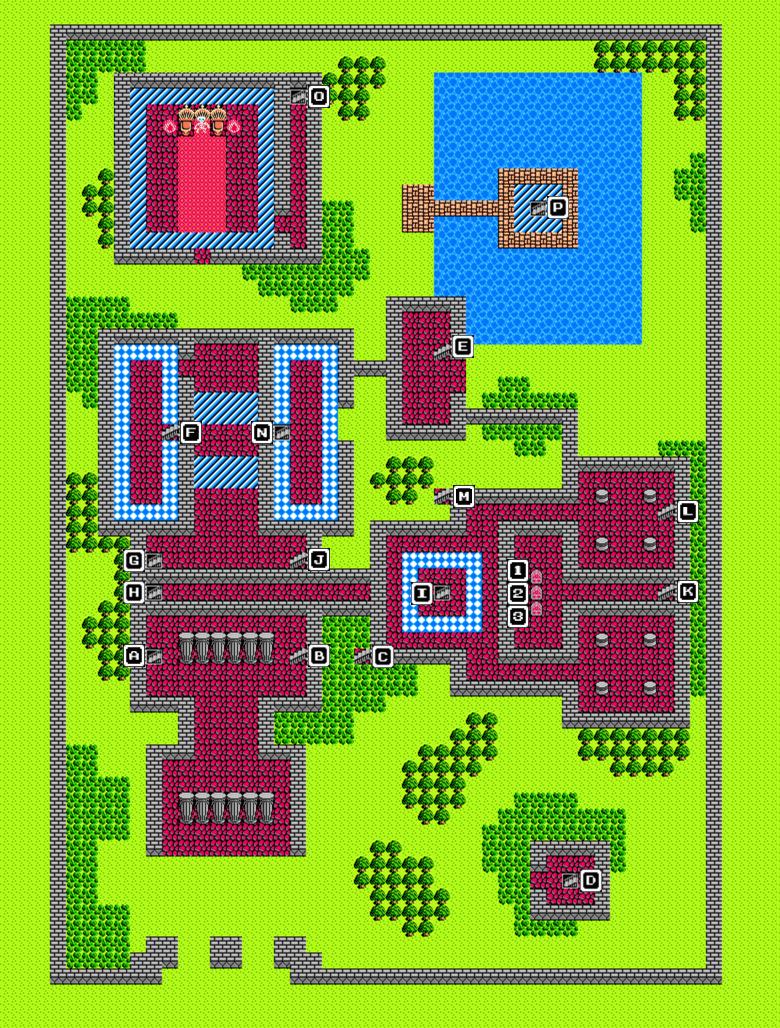
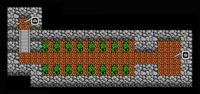
Word on the street is that the king is a dick. You’ll witness a funeral procession in the cemetary for some poor sap who angered his higness, and learn how he used to be a decent guy. Note that the item shop will be closed until the funeral is finished. Some of the townsfolk have chosen to use the monster arena as an outlet for their rage, and you’re free to join them. There’s also some great new stuff at the armory; the Hero and Soldier could benefit from the (expensive) Dragon Killers, and everyone can enjoy the stylish new Silver Shield. Pick one up for your Pilgrim or Sage, at least.
It’s also said that the king possesses the Staff of Change, which is exactly what we came to Samanao for. Surely we can reason with him! Approach the castle, but you’ll find it impossible to get past the two sentries by the entrance, Instead, head around the east side and into the kitchen. Try to talk to the king, and bam! Thrown in the slammer.
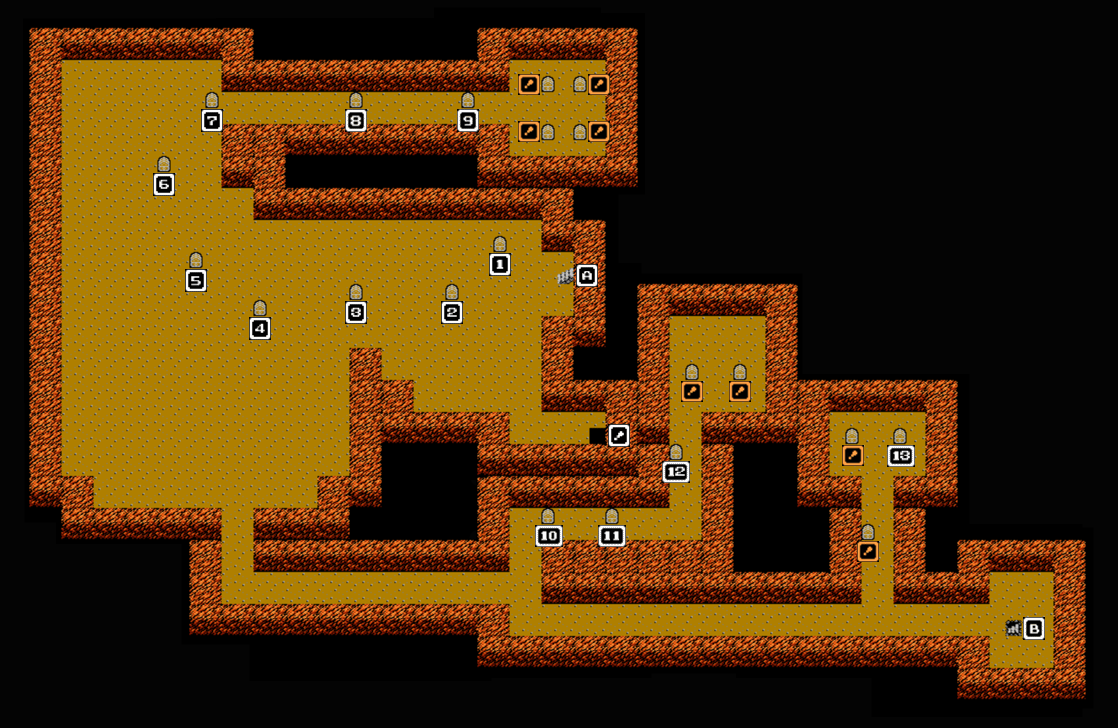
Temper confirmed, you may now exit your cell and ask the other inmates about the situation. The man in the northeast cell provides a juicy bit of info: the Mirror of Ra, used to reveal a person’s true identity, is hidden in a cave to the south. Continue to the southern cell to find the true king, who bemoans his loss of power to a monster! That clinches it, we need to head for that cave. Exit through the cell door on the left and find a hidden passage three steps from the top wall.
From Samanao, take a short walk southeast to find the cave in a swamp across a bridge.
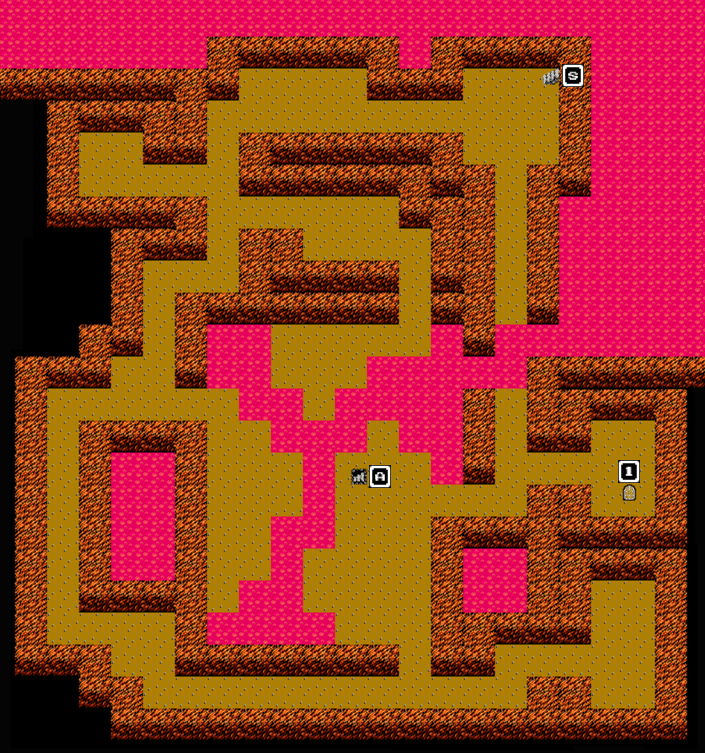
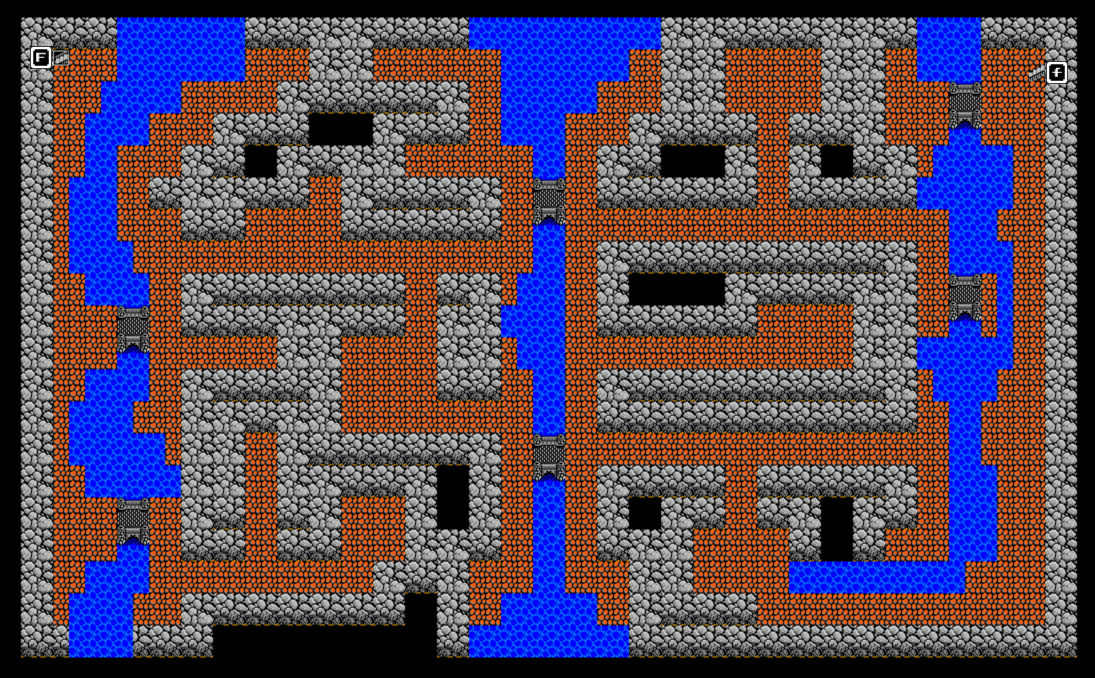
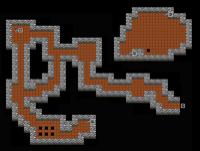
| The Cave Southeast of Samanao |
| B1 |
 |
|
| B2 |
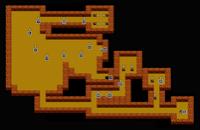 |
[1] 128 G
[2] Strength Seed
[3] 56 G
[4] Wing of Wyvern
[5] 568 G
[6] 24 G
[7] Acorns of Life
[8] Medical Herb
[9] 320 G
[10] Vitality Seed
[11] 24 G
[12] Medical Herb
[13] Stone of Life
|
| B3 |
 |
[1] Animal Suit
[2] Mirror of Ra
|
| B4 |
 |
|
B1 is a whole lot of nothing, but B2 contains a total of 21 chests, eight of which are Mimics. Check the map to avoid a messy fight. After looting all of the real chests, ignore [B] and fall down the hole just below [A]. Grab the Mirror of Ra from the chest on B3, and that’s it! The other chest on B3 is a worthless Animal Suit, so you’re safe to cast Outside and Return to Samanao.
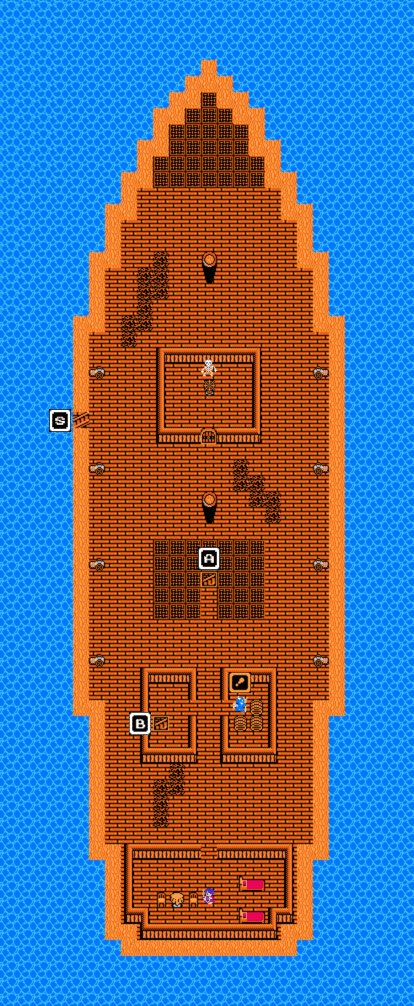
Once back, heal up and use the Lamp of Darkness. Enter the castle through the kitchen and work your way around the first floor to the stairs in the northeast corner. Continue up two more levels until you reach the top. Fall from either the south or west side of the tower to land just outside the king’s chamber. Enter from the top and use the Mirror of Ra in front of the sleeping king to initiate a fight with the Boss Troll.
This guy is a pretty sad excuse for a boss (he’s actually a regular enemy later on) and can be downed in just a few turns if you’re fast enough to wear through his invisible 100 HP regen. Hero and Pilgrim should attack, Pilgrim should cast Sap and Healmore when necessary, and Sage can pile on the Increase to dull the Boss Troll’s attacks. Once he’s down, grab the Staff of Change from the chest behind his bed.
Our business in Samanao is finished, but we can get some use out of the Staff of Change before trading it to the old man in Greenlad. Return to Noaniels and walk west to the Hidden Village of Elves we visited earlier in the game. Using the staff from your inventory will change the party into one of many different kinds of NPCs (including a few monsters!). Remember how this village hates humans? Use the staff until you change into elves or dwarves (do so near the item shop, as the staff’s effects wear off after 20 steps), then speak with the merchant to view her wares. This is the only place in the game that sells Wizard’s Rings, which restore MP (but break after several uses), so stock up if you like. Be warned that this is in fact your only chance to buy them in the entire game, and once we trade away the Staff of Change the shopkeep will return to shunning us.
Once you’re satisfied, Return to Aliahan (Vault the Mirror of Ra) and sail east to the edge of the island. Now head south until you find a large glacier with a green southern shore and single green square near the bottom. This is Greenlad, and the square is the home of the old man we want to talk to. Enter and walk north until you find his hut. Talk to him to trade the Staff of Change for the Sailor’s Thigh Bone. Creepy, but invaluable.
(NOTE: The phantom ship can sometimes be seen offshore before you have your own ship. After you have it, however, the ship will disappear until you obtain the Sailor’s Thigh Bone. The item itself is not only useful for finding the coordinates of the ship, but a requisite flag for the in-game spawning of the ship, which always occurs off the coast of Portoga.)
2. The Phantom Ship
It’s time to seek out the Phantom Ship. To do so, use the Sailor’s Thigh Bone from your inventory while on the overworld map and follow the directions to the derilect ship. (This should be a pretty familiar procedure to fans of the original Dragon Warrior, in which the Token of Erdrick could be located by using Gwaelin’s Love in much the same fashion.)
Anyway, once you locate the ship, sail right into it to enter. It’s a pretty brief little dungeon.
| The Phantom Ship |
| F1 |
 |
|
| B1 |
 |
[1] 128 G
[2] 136 G
[3] 144 G
[4] Full Moon Herb
[5] Locket of Love
|
Our goal is the Locket of Love on the lower deck of the ship. Grab it and walk back to the beginning (no Outside here, sorry) to exit the Phantom Ship.
Locket in hand, Return to Noaniels and board your ship. Follow the coastline east and then south, eventually entering through an inlet located between two glacier-lined beaches (feel free to disembark near the shrine to grab a Leaf of the World Tree from the center of the four mountains nearby, if you like). Continue southwest until the bay opens up, then head westward until you see a narrow strait. Attempt to pass through, and whoa! Olivia’s curse will slam your ship backwards into the shoals. From this point (no other point will work) select the Locket of Love from your inventory to dispell the curse. Share a moment with the deceased lovers, then continue on through to the shrine.
Once inside, you may speak with Simon’s ghost in the southwest room, who informs you that the Sword of Gaia is hidden next to his corpse. Like most ghosts, Simon is a bit hazy on the details, so head east into the next room and search the space to the left of the skeleton on the bed. We are one step closer to obtaining the Silver Orb.
3. The Cave of the Necrogond
Cast Return to Assaram, and board your ship. Head south and head directly west when the path splits. Work your way through the inlet between the mountains until you hit land. Walk down to the “volcano,” represented here on the NES as a black square surrounded by hills. Use the Sword of Gaia from your inventory to blaze a path of glory.
Follow the new path south between the mountains, hanging a left at the swamp, ultimately arriving at the cave. It’s a bit of a navigational bitch, but guess what! You’ve got the map.
First off, just getting into this thing is a killer. The Frost Clouds en route to the cave from the volcano will lambast you with frost breath and Snowblast spells. The Trolls will bludgeon you. It seriously helps to have the HealAll spell for this excursion, learned by your Pilgrim and Sage at 30, and your Hero at 33.
This thing starts at B5, and you must battle your to the way to the surface on the other side. Only B4 contains any treasure, but it is highly worth collecting.
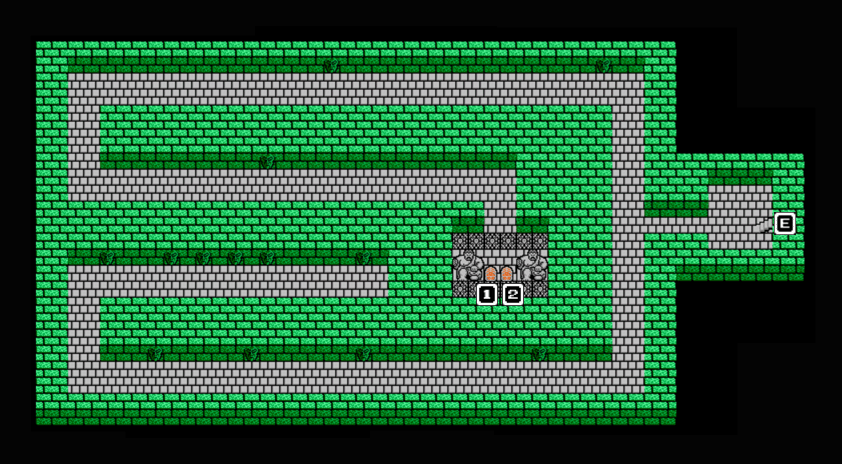
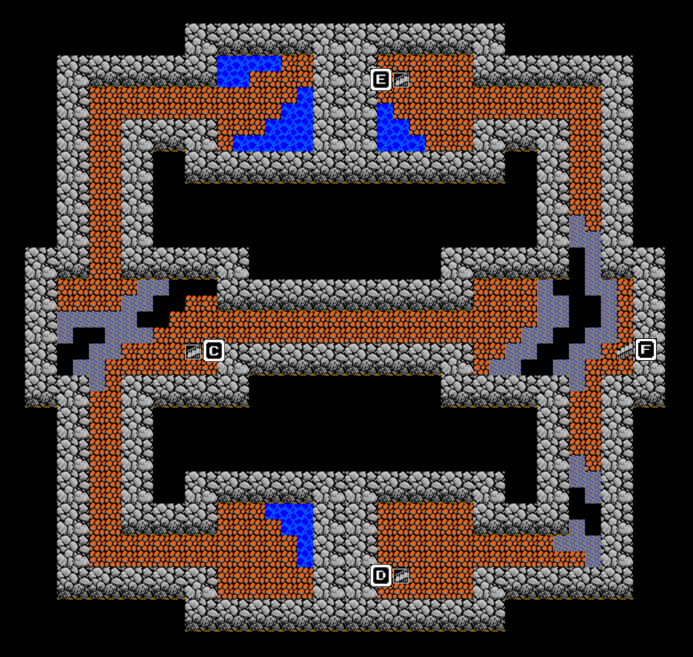
| The Cave of the Necrogond |
| B1 |
 |
|
| B2 |
 |
|
| B3 |
 |
|
| B4 |
 |
[1] 784 G
[2] Thunder Sword
[3] Swordedge Armor
|
| B5 |
 |
|
Plunder B4 of its delectable Thunder Sword and Swordedge Armor, both of which will find a happy home on your hero. Bequeath his hand-me-downs to your other characters as necessary. Follow the maps to B2, at which point you should head east and fall down the pit. From this point on B3, head north to the [E] stairs and continue as usual. Not much to it, but watch out for the enemies. This thing is ten kinds of bitches. Marauders can attack twice per round and numb your whole party with breath (which equals game over), while Lionheads and Minidemons can (and will) blast you with magic. Hologhosts will cut right to the chase with the instant-death Defeat spell. Grinding may be required.
On the other side, you’ll spot the palace of the archfiend, inaccessible behind its moat and mountains. Head for the shrine you see to the northeast. The old man is so damn impressed that you slogged your way through the Cave of the Necrogond that he simply hands over the Silver Orb, no questions asked.
T. The Yellow Orb Revisited
It’s been a while since we dropped off our newbie merchant, so let’s pay him a visit. In case you’ve forgotten the path to newtown, Return to Portoga and sail west, then north when you hit the mountains, and enter the light green patch in the forest. You’ll notice that your new town has been named after your merchant (i.e. “Welcome to Nichville. This is the town that Nich built.”), who currently resides in the house on the west side of town. Visit him and plunder the chests on either side of his throne for 240G and a Luck Seed.
| Newtown Goods & Services |
| Priest |
No
|
| Inn |
60
|
| Item Shop |
Medical Herb
Fairy Water
Wing of Wyvern
Poison Moth Powder
Spider’s Web
Invisibility Herb |
8
20
25
500
35
300
|
| Armory |
Zombie Slasher
Dragon Killer
Staff of Judgment
Magic Armor
Sacred Robe
Dragon Mail
Silver Shield |
9800
15,000
2700
5800
4400
9800
8800
|
| Dinner & a show |
50,000
|
But speak with the old man milling about near the house and whoops, it looks like your merchant is a bit of a slavedriver. The citizens are considering revolting against your poor merchant, but these events are necessary in order to claim our orb. Speak with the citizens and then use the Lamp of Darkness to get things rolling.
At nighttime, speak with the three scheming gentlemen behind the jail, as well as the old man trying to enter the merchant’s house. Stay at the inn until morning, then exit and reenter town. Looks like your merchant was finally brought to justice, as he can be found stewing in the lone jail cell south on the end of town. Speak with him and he’ll tell you to search behind his throne. Do so to procure the Yellow Orb. That makes six!
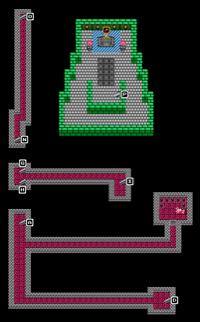
U. Godbird Ramia
Haul your pretty orbs down to the shrine we visited earlier (Return to Noaniels and sail north until you find the island) and place an orb at each altar, then speak with the twins. The egg in the center will hatch, releasing a spazzy white bird! Exit the shrine to find your new ride, Ramia, parked just north of the shrine. You may recognize our new friend from DQVIII, in which he played the same role.
Ramia is a nice upgrade from your ship. Your party can pass over all kinds of terrain on birdback, allowing us access to the archfiend’s fortress, which is surrounded by mountains. Before that, though, we’ll need to make one quick stop at the castle of the Dragon Queen. Return to Lancel and board Ramia. Fly north until you spot a castle encircled by a ring of mountains.
A pair of talking horses will greet you at the door, welcoming you to the castle of the Dragon Queen. The castle itself is small but a bit tough to navigate as some doors cannot be seen. If you enter through either of the magic doors in the front, you’ll meet a couple of dwarves who explain that the queen is about to lay an egg, but at the cost of her own life. She can be found by entering the castle from the north side, unlocking the unseen door in the center of the wall and walking south. The Dragon Queen will give you the Sphere of Light, a powerful tool for use against evil. Speaking of which!
V. The Castle of Baramos
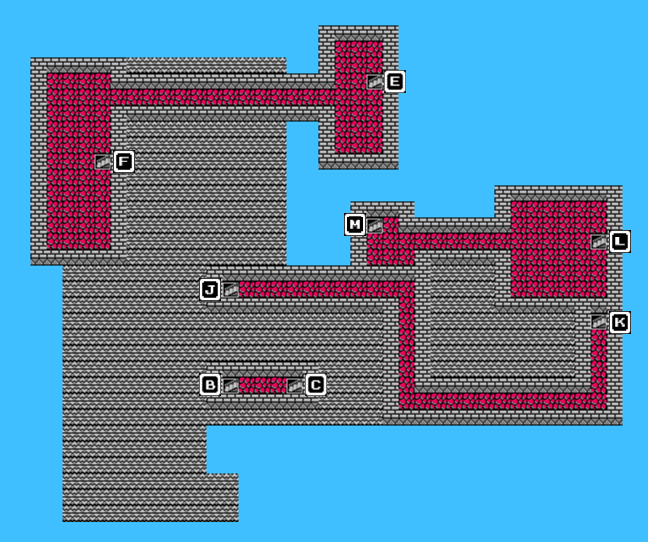
The lair of the archfiend is found just north of the Cave of the Necrogond; we passed it while hunting for the Silver Orb. The simplest way to get there is to Return to Romaly and fly directly south. Directly adjacent to the castle is a small pit surrounded by marshes. You can enter it to speak to the lone guard about this mysterious chasm. Once your curiosity is sated, land next to Baramos’s castle and head inside.
| The Castle of Baramos |
| B1 |
 |
|
| 1F |
 |
[1] Demon Axe
[2] Wizard’s Ring
[3] Unlucky Helmet
|
| 2F |
 |
|
Despite consisting of only three floors, this dungeon can be confusing because of its layout. There are three treasures (two of them cursed) found on the first floor, and Metal Babbles can sometimes be found milling about. Downing just one of the slippery little guys will net everybody 10,000 experience points and provide some much needed level gains. But for the most part, the enemies here are lethal. Stone Hulks have high HP and strength, while Hologhosts and Evil Mages prefer to cheese their way through battle with instant death and confusion spells, respectively. Meanwhile, Snow Dragons and Lionheads excel at party-wide attacks.
Looking at the map, you can safely avoid staircases [A], [B], [C], and [D], as they simply link up with each other and get you nowhere. Start instead by following the wall east and north, around the side, to staircase [E]. On 2F, take [F] to return to the first floor. From here, walk around into the hallway and head south through the barriers (cast Stepguard if you have it!) to reach another set of staircases. Take [G] if you’re looking for the archfiend, but don’t forget that [J] leads to that Wizard’s Ring (as well as two cursed items). From [G], you can reach Baramos by taking the following route: [I], [L], [M], [N], [O], [P].
Once you reach Baramos, heal up and approach him (after casting Stepguard). The battle won’t commence until you talk to him, so stroll right up to his face before healing up or using your Wizard’s Rings. Speak with him once you’re ready. Baramos’s worst attack is his flaming breath, which can do about 90 damage to everyone, followed by the Explodet spell which does about 50-70 to all members. His Blazemost spell can deal up to 100 damage to a single target, he attacks physically for almost as much, and his Chaos and Limbo spells are just a pain in the ass. And of course he can act twice and regains 100 HP per turn.
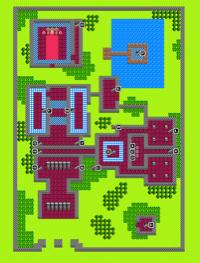
Start off by casting SpeedUp to give your team the edge when on the defensive, and have your Wizard cast Bikill on your Hero and Soldier. After that it’s all swinging and healing, hoping that Baramos doesn’t use flaming breath and Explodet in the same turn. Don’t bother with the Sphere of Light, as it is not used in this battle. His attacks are powerful, but for an almighty archfiend, Baramos does not have a whole lot of HP. Once you’ve downed him, cast Outside and Return to Aliahan for a warm greeting from the king! Congratulations!
|

 Dragon Warrior III: A Walkthrough in Three Acts