|
G. Assaram
Assaram is the ripoff capital of the world. Some of the shops (Item Shop 2 and Armory 2) don’t list any prices, and charge inflated amounts for even basic items. The trick is to haggle, at least in the Dragon Warrior sense of the word. Refuse the shopkeepers’ offers three times to be offered the real prices, listed below. The problem is that these “lowered” prices are still double what merchants in other towns charge for them. You’re best off not bothering with the merchants at all.
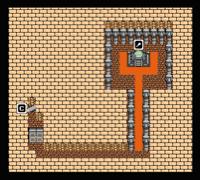
However, there is a third armory that only opens at night, located at the top of town. This guy only offers one new weapon, the Battle Axe, but you’ll probably want to pick one up for your Hero. Everything else in town is either old, worthless, or available in the next town for half the price. Where Assaram does excel is in its exciting night life. Treat yourself to a show, a Puff-Puff massage, or have your “fortune” told! What happens in Assaram stays in Assaram.
| Assaram Goods & Services |
| Priest |
Yes
|
| Inn |
28
|
| Item Shop 1 |
Antidote Herb
Full Moon Herb
|
10
30
|
| Item Shop 2 |
Medical Herb
Antidote Herb
Fairy Water
Wing of Wyvern
Full Moon Herb
Spider’s Web |
16
20
40
50
60
70
|
| Armory 1 |
Chain Mail
Half Plate Armor
Bronze Shield
Iron Shield
Iron Apron
Revealing Swimsuit
|
480
1100
180
700
700
78000
|
| Armory 2 |
Battle Axe
Giant Shears
Cloak of Evasion
Turban
Iron Helmet
Staff of Force
|
5000
7400
5800
320
2000
5000
|
| Armory 3 |
Magic Knife
Chain Sickle
Iron Spear
Broad Sword
Battle Axe
|
200
550
750
1500
2500
|
Once you’ve had your fill of excitement, rest up and head west through the desert to the Queendom of Isis
H. Isis and the Magic Key
Lots of great stuff for sale here, including a rather destructive weapon for your soldier, the Giant Shears. By now you’ve probably been able to deduce that the Magic Key, next on our list of important items, is held in the Pyramid to the north. The Pyramid is a dungeon unlike any we’ve dealt with before, so you’ll need to be prepared.
And what better way to prepare than with a lightning-quick healer! Once you’re through loitering around town, enter the castle in the middle. Follow the bushes to your left, head north at the bend, and pass straight through the wall. Continue north and go down the stairs at the bend. Head right and then up to find another set of stairs leading to the Meteorite Armband! This stellar piece of equipment doubles the agility of the wearer, so throw it on your Pilgrim for the time being.
| Isis Goods & Services |
| Priest |
Yes
|
| Inn |
40
|
| Item Shops |
Medical Herb
Antidote Herb
Fairy Water
Wing of Wyvern
Full Moon Herb
Leather Helmet |
8
10
20
25
30
80
|
| Armory |
Broad Sword
Battle Axe
Giant Shears
Half Plate Armor
Cloak of Evasion
Full Plate Armor
Iron Shield
|
1500
2500
3700
1100
2900
2400
700
|
| Monster Arena |
Ticket
|
130
|
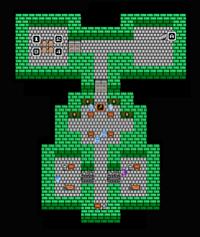
Our business in the Pyramid is twofold: find the Magic Key, and plunder with reckless abandon. It’s best to approach this dungeon in two trips. The first trip will focus on finding the key and raiding the treasure room on the fourth floor. After cleaning out the upper floors, you’ll want to return to Isis to heal up before returning to the Pyramid to hunt for the Golden Claw, housed in the basement.
| The Pyramid |
| B2 |
 |
[!] Golden Claw
|
| B1 |
 |
|
| 1F |
 |
[1] empty
[2] empty
[3] empty
[4] empty
[5] empty
[6] empty
|
| 2F |
 |
[1] empty
|
| 3F |
 |
[1] Vitality Seed
[2] Magic Key
[!]x4 Buttons
|
| 4F |
 |
[1] 176 G
[2] 40 G
[3] Strength Seed
[4] 80 G
[5] Agility Seed
[6] 112 G
[7] 24 G
[8] 304
[9] Wing of Wyvern
[10] 56 G
[11] Medical Herb
[12] 24 G
|
| 5F |
 |
[1] Flashy Clothes
|
| 6F |
 |
|
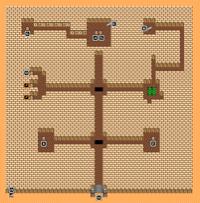
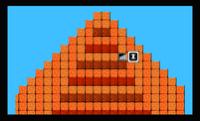
First off, be aware that the pitfalls marked on the 1F map are not visible in game, at least not until it’s too late. Avoid them by hugging the walls as you work your way up. Ignore all chests on 1F and 2F, as they are either empty or trapped. If you somehow manage to fall through a pit and into B1, hightail it out of there. All magic is disabled in the basement, which means no Heal, no Outside, no nothing. It’s actually a good place to level or raise gold — the Froggore Kings and Shadows are helpless without their spells — but not if you’re unprepared.
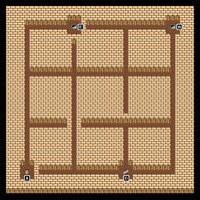
2F is a simple, just head south to [D]. Ignore [E]. The Magic Key is kept on 3F, behind a large door in the center of the room. There are four switches on 3F: two on the left, and two on the right. Numbering them from left to right, the large door can be unlocked by pressing switch #4 (the far right one) and then switch #1 (the far left one). Deviating from this order will result in a pit opening up and dropping the party down into 2F. Grab the treasure and proceed up to 4F by either [F] or [G].
Prepare to do some fighting on 4F. Mummies and Mummy Men guard each of these dozen chests, but as this gauntlet of the undead is the only “boss” of the Pyramid, hold nothing back. The Wizard’s Firebane spell is particularly nasty against a single group of enemies. If you’re pressed for time or energy, concentrate on simply getting chests [3] and [5]. Head up to 5F and get the Flashy Clothes (for the Merchant you don’t have), and then up to 6F. Walk off the edge and Return to Isis to heal up.
Now it’s time for Pyramid: Round II. Before you set out, be sure to fill up everyone’s inventory with Medical Herbs to make up for the loss of your party’s magic in the basement. Upon entering the Pyramid and before climbing its steps, head directly west and down staircase [A]. On B1, you’ll need to Search for staircase [C] before it appears. Descend to B2. Take the Golden Claw from the coffin (equip it on your Fighter if you’ve got one) and begin the trek back out. Return to town and sell the claw for a tidy sum. And toss your Thief’s Key in the Aliahan vault, as we won’t be needing it anymore. The Magic Key is just that good.
I. Portoga
Walking is great, but isn’t it about time we made a course for the high seas? Word on the street is that the king of Portoga has a ship, and with your shiny new Magic Key, accessing Portoga is easy. Return to Romaly and follow the coastline west until you find a shrine. Enter, unlock the Magic Door, and emerge on the other side. You’ll pass a Jailer’s Door in the tunnel. You can’t open it yet, but keep it in mind. You’ll find Portoga to your southwest, calmly overlooking the sea.
| Portoga Goods & Services |
| Priest |
No
|
| Inn |
40
|
| Item Shop |
Medical Herb
Antidote Herb
Fairy Water
Wing of Wyvern
Full Moon Herb
|
8
10
20
25
30
|
Nothing interesting for sale, but you can score a Vitality Seed inside the castle, locked inside a room and surrounded by a barrier. Suck it up and trudge through. You’ll notice a vendor who sells nothing, but mentions that Black Pepper is a rare commodity in Portoga. So rare, in fact, that the king offers to give you a ship if you can retrieve some of the stuff for him. Not a bad deal! Black Pepper is sold in Baharata, just west of Assaram. The king will give you a letter addressed to Norud, the dwarf who lives in the connecting tunnel. Return to Assaram, heal up, and head into the cave.
J. Baharata
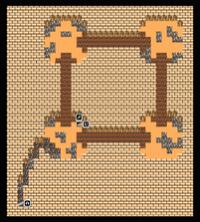
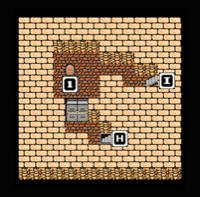
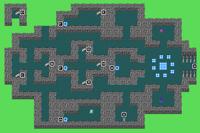
The cave to Baharata is enemy-free, and easily navigable. The map, while simple, has been included below because maps are fun. Harass Norud in his room by using the scroll from your inventory in front of him. Answer yes, plunder his few meager possessions, and follow him to find the exit.
(Finding a Magic Key and having a dwarf open up a tunnel with which to access new areas? Sound familiar, 8-bit RPG fans? That’s right! This is scene for scene the first fifty pages of Tom Clancy’s Executive Orders.
| Norud’s Tunnel |
| B1 |
 |
[1] Training Suit
[2] Club
[!] Secret path
|
Once you exit the cave, head east and follow the mountains south until you reach the town of Baharata. It’s not a grueling walk, but it’s long enough that the Avenger Jackals could take a chunk out of you, so be aggressive. They’ll cast Surround. Counter by nuking them in the face.
| Baharata Goods & Services |
| Priest |
Yes
|
| Inn |
48
|
| Item Shop |
Medical Herb
Antidote Herb
Fairy Water
Wing of Wyvern
Full Moon Herb
Spider’s Web
|
8
10
20
25
30
35
|
Again, no armory, so no big purchases, but take note of the two identical women near the town’s entrance who say the exact same thing. Eerie. Seems like all we need to do here is pick up some pepper for the king of Porto- what? The Black Pepper shop is closed! And only an act of heroism will reopen it? We may be able to assist.
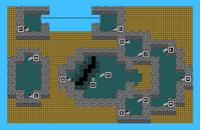
Talk to the old man and his young friend Galen on the southern beach to learn that Galen’s girlfriend Tania has been kidnapped. The old guy asks you if you’ll rescue her, but hotheaded Galen volunteers before you can say anything. A townsperson hints that the kidnappers fled to the cave east of town. Heal up and get moving! The cave can be found by heading east, crossing the bridge, and following the river north to another bridge. Cross and enter.
| The Cave East of Baharata |
| B1 |
 |
[1] 552 G
[2] Fairy Water
[3] 232 G
[4] Medical Herb
|
| B2 |
 |
[1] Strength Seed
[2] Acorns of Life
[3] Intelligence Seed
[4] Agility Seed
|
A cakewalk for the cartographically endowed. Treasure’s in the north, stairs in the south. Watch out for Man-Eater Chests and Catulas, as they will rapidly deplete your HP and MP, respectively. The information provided by the lone guard near the center would be useful if we didn’t have a map.
No random encounters on B2. Plunder the stash of stat-increasing items in the western chamber, then continue south to meet with some guards. Answer no to their question and a battle ensues. Single group spells work great, as does Parry-cancel. After you mop the floor with those goons, continue south to find Galen and Tania locked up. Open their cells and follow them out. Whoops! Kandar’s back, and he’s pissed.
The second Kandar battle isn’t as difficult as the first, mostly because your party has made great advances in strength and ability since your meeting in the Tower of Shanpane. The thing to watch out for here is that the second Kandar is the first boss in the game to start using invisible HP regen (about 50 HP per round; you won’t see a notification, but it’s happening), so you’ll want to hit him with a hard, concentrated attack. Fortunately, because he only shows up with two henchmen, there is little to distract you. Have the Hero and Soldier concentrate on Kandar while the Pilgrim Heals (and Healmores, as the damage builds). Your Wizard should have Blazemore by now, which is capable of downing the henchman in one shot each. Return to Baharata once the battle ends.
Turns out that Galen is the Black Pepper dealer of Baharata, and hands you a freebie in exchange for saving him and Tania. Prize in hand, Return to Portoga and speak with the king. Guess what time it is! Maritime.
K. Tedanki
Once you’ve taken control of the ship, sail south and follow the western coast. There’s a lighthouse just across the way, opposite Portoga, whose sole occupant advises you to go south (THANKS PAL). You’ll pass a shrine housing a lone priest before eventually wanting to take your ship down the third inlet you come across (the only one not blocked with a bridge) to find the next town. Worm your way inward, and head straight south to find the village of Tedanki.
| Tedanki Goods & Services (nighttime only) |
| Priest |
Yes
|
| Inn |
124
|
| Armory |
Staff of Force
Sledge Hammer
Zombie Slasher
Magic Armor
Sacred Robe
Bronze Shield
Iron Mask
|
2500
6500
9800
5800
4400
180
3500
|
If you sailed straight through from Portoga, it should be nighttime by the time you find Tedanki. And that’s good! Because Tedanki’s goods and services are only available at night. Because of its unfortunate geographic location (the backyard of the Archfiend) Tedanki has a bit of dilemma in that all of its inhabitants are dead. But that Zombie Slasher the ghost merchant sells you at night? That thing’s real. And it’s spectacular.
This may seem like an inconvenience at first, but if you search the second floor of the item shop during the daytime, you’ll find the Lamp of Darkness, which turns day into night when used. No, the real inconvenience comes from the fact that Tedanki is not Return-able, so you’ll need to embark from Portoga each time you want to visit. And we will be revisiting! For now, outfit your party and chat up the deceased denizens. You’ll learn the whereabouts of the Final Key, the [SPOILERS] last of the three keys. For now, though, you’ll want to Return to Baharata.
L. The Shrine of Dhama
It’s finally time to promote one of your hard-working party members to the vital role of Sage. From Baharata, board your ship and sail out to the coast. Follow it east and up into the first inlet you see. You’ll come to a place that looks like a castle, called the Shrine of Dhama. Once you enter, the gentleman by the door can save your game, and there’s a cheap inn off to the right-hand side if you need it.
Changing classes in DWIII is not terribly useful. One denizen of the shrine points out that you can turn a Wizard into a Soldier and be blessed with a fireball-slinging warrior, but neglects to point out that you will cease learning new spells or gaining any more MP. And because the Soldier and Fighter learn no magic, turning them into mages is pointless. No, the real action here comes in the form of the Sage, the supercharged mage class that can be obtained by ransacking the tower to the north. Once healed, exit the shrine and take a short walk to the northeast, into Garuna Tower. The tower provides a pretty good challenge, so it’s recommended that your party outfit themselves with the best Tedanki has to offer, especially Iron Masks for your Hero and Soldier. Once you’re set, exit Dhama and head northeast to Garuna Tower.
| Garuna Tower |
| 1F |
 |
[1] Intelligence Seed
|
| 2F |
 |
[1] Book of Satori
|
| 3F |
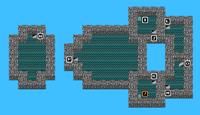 |
[1] 248 G
|
| 4F |
 |
|
| 5F |
 |
[1] Iron Helmet
|
This thing is daunting, but with so few treasures we can focus on navigating our way to the Book of Satori. Monsters of note include the Shadows, now no longer silenced by the Pyramid and able to deal out death spells. Sky Dragons and Rammores can spray your party with fire, while the Great Beaks strike twice per round. Grab the Intelligence Seed out of the chest near the entrance and then head for the [D] stairs in the northwest corner, as [B] and [C] lead to dead ends.
On 2F, cross the tightrope and take the [E] stairs back down to 1F. Take the portal [F] to the middle of the 1F map, where you’ll see three staircases going up. The [G] path leads to 3F’s paltry 248 G chest, while the [I] path leads to a trapped chest and should be avoided. Taking [H], [M], [O], [Q] will lead you to 5F and another tightrope. If you want an Iron Helmet, cross the tightrope and take the [S] stairs up to the one-room 6F (which I’ve just stuffed into the corner of the 5F map).
Here’s the tricky part. Return to the tightrope on 5F and do your best to find the middle of the thing. When you think you’ve got it, walk up or down to fall off the rope and land in the open area in the middle of 4F. Grab the Book of Satori from the chest, and that’s it! Note that changing class requires a character to be at least level 20, so you might want to stick around and level a bit if your Wizard (or Pilgrim, or whoever) isn’t quite there yet. Metal Slimes can sometimes be found in and around the tower.
Now, I really do recommend the Wizard for Sage class change. Even the Pilgrim gets a decent array of equipment to use, and middling stats, whereas the only thing the Wizard has going for him are the spells that are part of the Sage’s repertoire anyway. Playing conservatively, it’s nicer to have two potential healers rather than two nukers. So jam that mother to 20, bust into Dhama like you own the place, and talk to the priest with the Book of Satori in your excited Wizard’s inventory.
After the class change, your Wizard will begin life anew as a level 1 Sage. Head outside and knock around some monsters to shoot his level up a bit. It also helps to pick up some new equipment; the Sage can wield the Zombie Slasher like a pro, so head to Tedanki and pick one up, along with a suit of Magic Armor. You can also give your Sage the Iron Helmet you found in Garuna Tower. And don’t forget all those Agility Seeds you’ve been stockpiling in the Aliahan vault!
Now that your party setup is complete, it’s time to seek out the Final Key.
M. The Final Key
Obtaining the Final Key requires three stops. First, Return to Aliahan and board your ship. Sail directly west of the island until you hit land. You’ll find the village of Lancel just a short walk into the island, connecting to a cave enclosed by mountains.
| Lancel Goods & Services |
| Priest |
No
|
| Inn |
60
|
| Armory |
Magic Knife
Iron Spear
Battle Axe
Sledge Hammer
Cloak of Evasion
Sacred Robe
Iron Mask
|
200
750
2500
6500
2900
4400
3500
|
| Item Shop |
Fairy Water
Wing of Wyvern
Invisibility Herb
|
20
25
300
|
A quick chat with the townspeople reveals the following:
-
A special vase is needed to obtain the Final Key.
-
The Vase of Drought can be found in Eginbear castle, north of Portoga.
-
An Invisibility Herb is needed to sneak into Eginbear.
-
This town sells Invisibility Herbs!
That business with Lancel’s locked-up shrine and secluded cave will be tackled after we find the key, so for now pick up an Invisibility Herb and Return to Portoga. Sail west and north along the coast, continuing north until you reach Eginbear, our second stop. The guard at the entrance blocks your every move until you use your Invisibility Herb and slip past him. Don’t worry about the herb wearing off so quickly, the guard in the front is the only one that matters. You can even go upstairs and speak with the king, who will save your game.
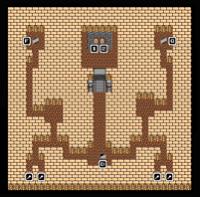
Locate the basement stairs on the west side of the castle and descend. A puzzle! The object here is to push the three boulders onto the three blue and white squares at the top. Have a go at it, but keep in mind that the boulders will sink if pushed into the water. Just go upstairs and return if you get stuck. And if you can’t figure it out:
-
Push the right boulder (#3) down one square.
-
Push the middle boulder (#2) left one square.
-
Push the left boulder (#1) up one square, then right two squares.
-
Walk back around and push #3 up one square, then down one square.
-
Push #1 straight up and onto one of the three tiles. Boulder #1 set!
-
Push #2 left one square, up one square, right two squares, and then straight up onto a tile. Boulder #2 set!
-
Push #3 up one square, left four squares, up one square, right two squares, and then straight up onto a tile. Boulder #3 set!
A path will open to the right. Follow it to a chest containing the Vase of Drought.
Our business in Eginbear is more or less finished, so head outside and Return to Aliahan. Sail straight south until you reach a small cluster of shoals, the final stop in our quest for the key. Sail your ship to the bottom of the shoals and select the Vase of Drought from your inventory. A shrine appears! Inside you’ll find the Final Key and a chatty skeleton who explains that all of the world’s woes come from a pit called Giaga, located in the mountains of the Necrogond.
Once you return to your ship, the shrine will sink once more. Toss the Vase of Drought and Magic Key in the Aliahan vault and Return to Noaniels. Board your ship and sail north until you find a large mass of ice with a lone shrine on the west side. Head for the shrine, but in doing so watch out for the annoying Hades’ Condors, whose Limbo spell can take members out of your party and send them back to Luisa’s eatery in Aliahan.
Speak with either of the twins praying in front of the egg to get an idea of what to do next. It looks like collecting the six orbs will awaken the phoenix Ramia. As with Dragon Quest II’s five crests, the difficulty in obtaining the orbs ranges from “freebie” to “you have got to be kidding me.”
|

 Dragon Warrior III: A Walkthrough in Three Acts